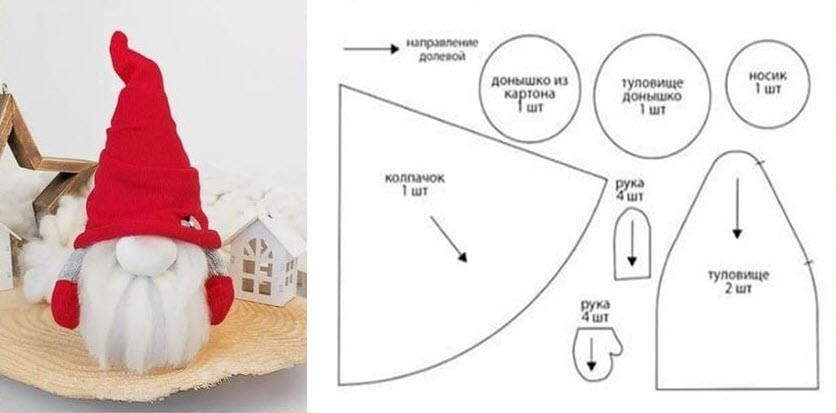
Creating a gnome sewing pattern is a fun and creative project. Below, I'll outline the steps to create a basic gnome sewing pattern suitable for beginners.
Materials Needed:
- Large sheets of pattern paper or tracing paper
- Pencil
- Ruler
- Scissors
- Fabric (felt, cotton, or other suitable materials)
- Matching thread
- Sewing machine or hand-sewing needles
- Stuffing material (polyester fiberfill)
- Needle and thread for hand-sewing
- Optional: Fabric glue, buttons, and other embellishments
Steps:
- Design Your Gnome:
- Start by sketching the design of your gnome. Determine the size you want the gnome to be and draw a rough outline of its body, hat, and any other accessories like a beard or nose.
- Decide on the gnome's features, such as the size and shape of the hat, the style of the beard, and any facial features like eyes, nose, and mouth.
- Create a Basic Gnome Body Pattern:
- For the body, draw a simple oval shape on your pattern paper. This will be the front of the gnome.
- Add seam allowances (typically 1/4 inch) around the edges of the oval.
- Cut out the pattern piece.
- Create a Hat Pattern:
- Draw a triangle shape on your pattern paper for the gnome's hat. The size of the triangle will depend on the size of your gnome.
- Add seam allowances to the sides and bottom of the triangle.
- Cut out the pattern piece.
- Create a Beard Pattern:
- Draw the shape of the gnome's beard on your pattern paper. It should be a curved shape that fits along the bottom of the gnome's face.
- Add seam allowances.
- Cut out the pattern piece.
- Cut Out Fabric Pieces:
- Place your pattern pieces on your chosen fabric and cut out the corresponding pieces. You'll need two body pieces (front and back), one hat piece (front), and one beard piece (front).
- Sew the Gnome:
- With right sides together, sew around the edges of the body pieces, leaving a small opening for turning and stuffing.
- Sew the hat and beard pieces in the same manner, leaving openings for turning.
- Turn and Stuff:
- Turn all fabric pieces right side out.
- Stuff the body and hat with polyester fiberfill to your desired level of fullness.
- For the beard, you can use white or gray yarn or faux fur. Attach the beard to the front of the gnome's body using fabric glue or by sewing it in place.
- Assemble the Gnome:
- Place the stuffed body on top of the stuffed hat, aligning the edges.
- Sew the body to the hat along the neckline.
- Add Facial Features:
- Sew or glue on buttons or other embellishments for the eyes and nose.
- You can embroider or use fabric paint to create a mouth.
- Final Touches:
- Add any additional details or accessories to your gnome, such as a ribbon around the hat or a small gift in its hand.
- Finish and Display:
- Close the opening in the body using a ladder stitch or slip stitch.
- Your gnome is now ready to be displayed or given as a gift!
Feel free to customize your gnome with different fabrics, colors, and embellishments to give it a unique personality and style. Gnome sewing patterns can be easily adapted to your creative preferences.


