Creating a sewing pattern for a stuffed bunny is a fun project. Here are the basic steps to create a simple bunny sewing pattern:
Materials You'll Need:
- Fabric for the bunny (e.g., cotton, fleece, or minky fabric)
- Fabric for the bunny's ears (in a contrasting color or pattern)
- Stuffing material (polyester fiberfill)
- Thread in matching colors
- Sewing machine or needle and hand-sewing supplies
- Pins
- Scissors
- Embroidery floss or fabric markers for details (optional)
Steps to Create the Bunny Sewing Pattern:
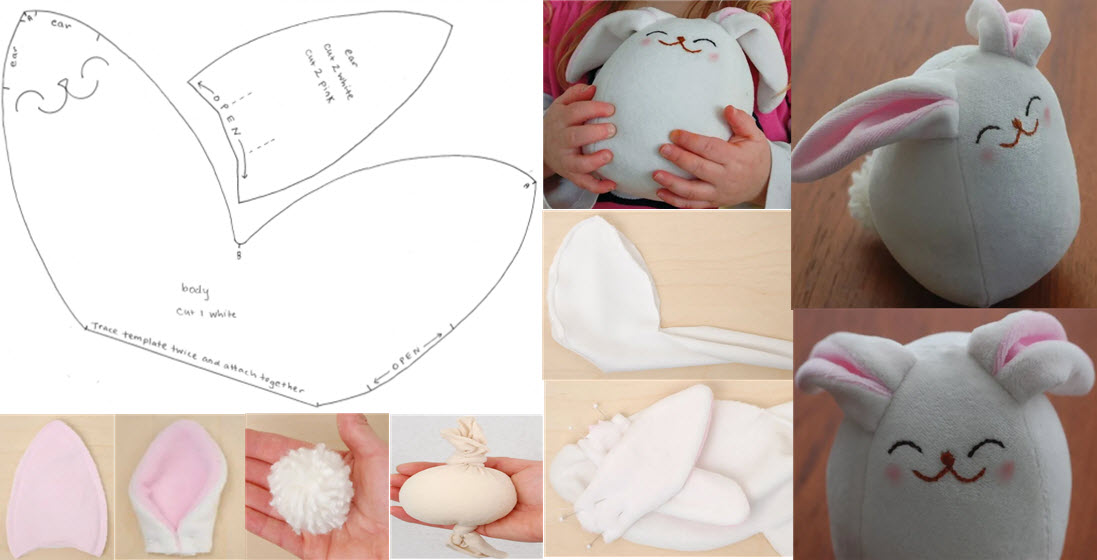
- Design Your Bunny: Sketch or draw your bunny design on paper. Decide on the size of your bunny and the shape of its body, ears, and other features. Keep it simple for your first pattern.
- Create a Paper Pattern: Using your sketch, draw the pattern pieces for the bunny on a piece of paper. You'll need patterns for the bunny's body, ears, arms, and legs. Make sure to include seam allowances (usually around 1/4 inch or 6mm) around each piece for sewing.
- Cut Out the Fabric: Pin the paper patterns onto your chosen fabric and cut out the pieces. You will need two identical body pieces and two ear pieces for each bunny. You can also cut out arms and legs if you want to add those.
- Sew the Ears: With the right sides of the fabric facing each other, sew around the curved edge of each ear, leaving the straight edge open. Turn the ears right side out and press them flat.
- Sew the Bunny's Body: With the right sides of the fabric facing each other, sew around the edges of the bunny's body, leaving a small opening for turning and stuffing. Make sure to reinforce the stitching at the start and end of the opening.
- Attach the Ears: Position the ears inside the body with the raw edges aligned, and sew them in place when you sew around the bunny's body. The ears should be sandwiched between the two body pieces.
- Turn and Stuff: Turn the bunny right side out through the opening you left in step 5. Stuff the bunny with polyester fiberfill until it's as firm as you like. Use a pencil or chopstick to help push the stuffing into small corners.
- Hand-Stitch the Opening: Close the opening in the bunny's body with a hand-sewn ladder stitch or slip stitch.
- Add Details: If you want to add facial features, use embroidery floss or fabric markers to create the eyes, nose, and mouth.
- Finish the Bunny: Trim any loose threads, and your bunny is complete!
Remember that sewing patterns can be customized in many ways. You can experiment with different fabrics, colors, sizes, and embellishments to create unique bunnies. Once you have the basic pattern down, you can get creative and make bunnies with different personalities and styles.


