Creating a sheath dress is a classic and versatile sewing project. Below, I'll provide a basic sewing pattern for a simple sheath dress that you can customize to your liking. Keep in mind that this is a general pattern, and you may need to adjust it based on your measurements and preferences.
Materials you'll need:
- Fabric (medium-weight fabric with some stretch, such as cotton sateen or ponte knit)
- Matching thread
- Sewing machine
- Scissors
- Pins
- Measuring tape
- Ruler or straight edge
- Pencil or fabric marker
- Zipper (optional, for dresses without stretch)
Instructions:
- Take your measurements: Measure your bust, waist, hips, and desired dress length. Also, measure the distance from your shoulder to waist, and shoulder to hip if you want to customize the dress further.
- Create the pattern:
- Front Bodice: On a large piece of paper or pattern paper, draw a rectangle with the width equal to half of your bust measurement, plus ease (about 2-3 inches or 5-7.5 cm for a fitted dress).
- Front Waist Dart: From the bust line, mark the distance to your waist and draw a vertical line (dart) about 6-8 inches (15-20 cm) long.
- Front Waist to Hip Dart (optional): From the waist, mark the distance to your hip and draw another vertical line (dart) about 6-8 inches (15-20 cm) long.
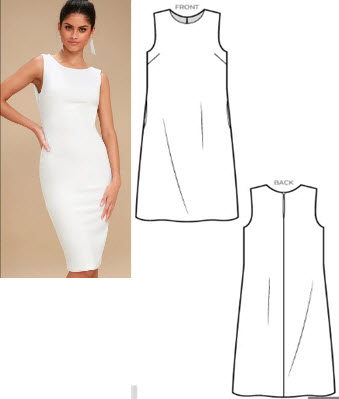
- Front Neckline: Draw the neckline shape you desire, such as boat neck, scoop neck, or V-neck.
- Front Armhole: Draw a smooth curve connecting the shoulder point and underarm point.
- Front Dress Length: From the waist or hip, mark the desired length of the dress, adding about 1 inch (2.5 cm) for hem allowance.
- Cut the fabric: Use your pattern to cut two front bodice pieces (mirror images) from the main fabric.
- Create the back bodice: Place one of the front bodice pieces on a new piece of paper and trace around it to create the back bodice pattern. The back bodice will be similar to the front bodice but with a higher neckline and no waist darts.
- Cut the fabric: Use your back bodice pattern to cut two back bodice pieces (mirror images) from the main fabric.
- Sew the dress:
- With right sides facing, sew the shoulder seams of the front and back bodice together.
- If you added waist darts, fold the fabric along the dart lines with right sides together, and sew along the lines to create darts.
- With right sides facing, sew the side seams of the front and back bodice together.
- Finish the armholes and neckline using bias binding or facing.
- Hem the bottom of the dress to your desired length.
- Optional zipper: If your fabric doesn't have stretch or you prefer a fitted dress with a zipper, you can add a zipper to the center back seam. Insert the zipper according to your preferred method.
- Try on the dress: Once the dress is complete, try it on to check the fit and make any necessary adjustments.
Remember, this is a basic sheath dress pattern, and you can customize it further by adding sleeves, different necklines, or embellishments. Have fun experimenting with different fabrics and styles to create the perfect sheath dress for you!


