Creating pattern blocks for sewing involves drafting basic templates that serve as building blocks for various garment designs. Here's a simple guide to make pattern blocks for sewing:
Materials Needed:
- Large sheets of paper (such as craft paper or pattern paper)
- Pencil
- Ruler
- French curve (optional)
- Tape
- Scissors
- Tracing paper (optional)
Instructions:
1. Take Measurements: Start by taking accurate body measurements. Key measurements include bust, waist, hip, shoulder width, and back length. If you're making a bodice block, additional measurements such as bust apex, underbust, and shoulder slope are crucial.
2. Draw a Rectangle:
- Create a rectangle on the paper using the bust, waist, and hip measurements.
- Divide the rectangle into four equal vertical sections for the front and back panels.
- Label the top as the shoulder line, and the sides as the center front/back and side seams.
3. Draft the Bodice:
- For the front bodice, measure down from the shoulder line to mark the bust point and draw a horizontal line.
- Place the bust, waist, and hip measurements along the corresponding lines on the rectangle.
- Connect the points smoothly, creating a gentle curve for the armhole and side seam.
- Repeat the process for the back bodice, adjusting the curve for the back armhole and adding a slight curve for the back waist.
4. Add Seam Allowances:
- Outline the pattern pieces with seam allowances (typically 1/2 inch or as per your preference).
- Include seam allowances on the neckline, armholes, side seams, and shoulder seams.
5. Draft the Sleeve:
- Measure the arm's circumference and length.
- Draw a rectangle for the sleeve, with the width matching the arm circumference.
- Taper the rectangle slightly towards the wrist.
- Add seam allowances to the sides and the sleeve cap.
6. Draft the Skirt:
- Measure the desired skirt length, waist, and hip circumference.
- Draft a rectangle for the front and back skirt panels, incorporating darts or gathers as needed.
- Add seam allowances to the sides and waist.
7. Finalize and Cut:
- Review the drafted patterns for accuracy and symmetry.
- Cut out the pattern pieces.
8. Test and Refine:
- Create a muslin or cheap fabric prototype to test the fit.
- Make any necessary adjustments to the pattern based on the fitting results.
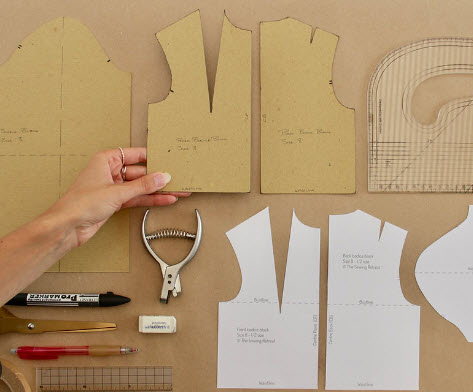
9. Trace onto Sturdier Paper:
- Once satisfied with the pattern, trace it onto sturdier paper or cardboard for longevity.
These are basic instructions for creating pattern blocks for a simple bodice and skirt. Depending on your project, you might need to create separate blocks for pants, sleeves, collars, etc. Always test your patterns with a muslin or inexpensive fabric to ensure a good fit before cutting into your final fabric.


