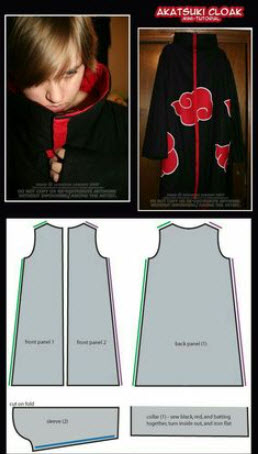
Creating a sewing pattern for an Akatsuki cloak requires specific measurements and details. Since I cannot provide you with a visual representation, I will describe the general steps and measurements involved in making an Akatsuki cloak. Please note that this pattern assumes a certain level of sewing skill and knowledge.
Materials needed:
- Black fabric (amount depends on your measurements)
- Red fabric for the clouds
- White fabric for the cloud outlines
- Matching thread
- Scissors
- Sewing machine or needle
- Measuring tape
- Pins
Here's a step-by-step guide to creating an Akatsuki cloak:
- Take your measurements:
- Shoulder width: Measure from shoulder to shoulder across the back.
- Chest circumference: Measure around the fullest part of your chest.
- Length: Measure from the base of your neck to your desired cloak length.
- Create the pattern pieces:
- Front and back panels: Cut two rectangular pieces of black fabric according to your desired length and width. The width should be equal to your shoulder width multiplied by 1.5, allowing for some ease.
- Collar: Cut a rectangle that is approximately 4 inches wide and the same length as the neckline of the front and back panels.
- Cloud shapes: Draw cloud shapes on paper and cut them out. Use these as templates to cut the red fabric for the clouds and the white fabric for the cloud outlines.
- Sewing the cloak:
- Sew the shoulder seams: Place the front and back panels right sides together and sew along the shoulder seams.
- Attach the collar: Fold the collar piece in half lengthwise with the right sides together and sew along the raw edge. Turn it right side out and attach it to the neckline of the cloak, matching the raw edges and pinning it in place. Sew along the neckline to secure the collar.
- Hem the edges: Fold and press the raw edges of the cloak under, then stitch them in place to create a clean hem.
- Add the cloud details: Position the red fabric clouds on the cloak, following the Akatsuki design. Pin them in place and sew around the edges. Then, position the white fabric cloud outlines on top of the red fabric clouds and sew around their edges.
- Finish the cloak: Trim any loose threads and give the cloak a final press.
Remember to adapt the measurements and details according to your own body size and personal preferences. It's always a good idea to make a mock-up or test version of the cloak using cheaper fabric to ensure the fit is correct before cutting into your final fabric. Good luck with your sewing project!


