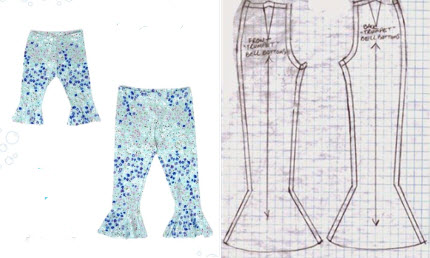
Creating bell bottom pattern is relatively easy. You can modify an existing pants pattern or draft one from scratch using your measurements. Here's a general outline to help you get started:
Materials Needed:
- Lightweight fabric with a bit of stretch (e.g., cotton, denim, jersey)
- Elastic band for the waist
- Sewing machine or needle and thread
- Scissors
- Pins
Instructions:
- Take Measurements: Measure your waist, hips, inseam, and desired length for the bell bottoms.
- Draft the Pattern:
- Decide on the desired width of the bell bottoms. You can start with a slightly flared or wide-legged pants pattern.
- Using your measurements, draft the front and back pant patterns accordingly. Keep in mind that the waist should be fitted, gradually widening towards the bottom of the legs.
- Add seam allowances to all edges.
- Cut and Sew the Pants:
- Cut out the front and back pieces of the pants from the fabric.
- Sew the front and back pieces together at the side seams.
- For the waistband, fold over the top edge of the pants (about 1 inch wide) to create a casing for the elastic.
- Leave a small opening in the waistband casing to insert the elastic.
- Measure the elastic to fit comfortably around your waist and insert it through the opening.
- Overlap the ends of the elastic and sew them together securely. Then, sew the opening closed.
- Hem the Bottom Edge:
- Try on the pants and determine the desired length for the bell bottoms.
- Hem the bottom edges of the pants to the desired length.
- Finish the Bell Bottoms:
- Once the elastic waistband and hems are done, your simple bell bottoms are ready to wear!
Remember that the key to achieving a good fit is accurate measurements. Adjust the width of the pants' bottom and the flare to your preference, making them wider for a more dramatic bell shape or more subtle for a gentle flare.
Feel free to experiment with different fabrics, colors, and patterns to create a stylish pair of bell bottoms that suits your personal style. Enjoy your sewing project!


