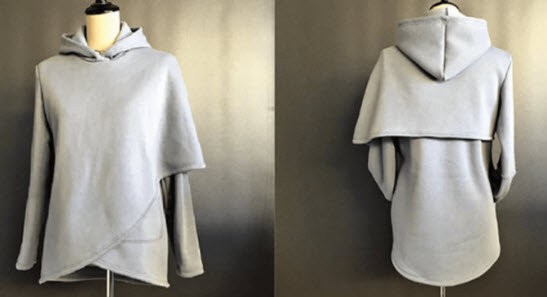
Creating a sewing pattern requires specific measurements and design details to ensure accurate results. While I can't provide images or diagrams, I can certainly describe the general steps for sewing a hooded capelet. Keep in mind that sewing patterns often include various sizes, measurements, and cutting instructions.
Here's a basic outline of how you might create a simple hooded capelet sewing pattern:
Materials Needed:
- Fabric (e.g., wool, fleece, velvet)
- Lining fabric (optional)
- Thread
- Sewing machine or needle for hand-sewing
- Scissors
- Pins
- Hood template (drawn on paper)
Pattern Creation:
- Measurements:
- Neck circumference: Measure around the base of the neck.
- Shoulder width: Measure from one shoulder point to the other.
- Capelet length: Decide how long you want the capelet to be, typically around waist or hip length.
- Hood dimensions: Create a hood template on paper with the desired shape and size. This should include the back and front panels.
- Front and Back Panels:
- Cut two identical pieces for the front and back panels. The width of each panel should be approximately half of the shoulder width, plus seam allowance.
- The length of the panels will be your desired capelet length, plus seam allowance.
- Hood:
- Cut two hood pieces from your fabric, following the template. If you want a lined hood, cut two more from the lining fabric.
- Sew the outer hood pieces together, right sides facing, leaving the neck opening open. Repeat with the lining if applicable.
- Turn the outer hood right side out. If lining, insert the lining hood into the outer hood so the right sides are facing each other. Align the edges and pin in place.
- Sew around the curved edge of the hood, attaching the lining and outer fabric. Leave the front opening unsewn.
- Attaching the Hood:
- Pin the raw edge of the hood to the neckline of the capelet, right sides facing. The hood should be centered with the back panel.
- Sew the hood to the capelet neckline with a 1/2-inch seam allowance.
- Finishing:
- Finish the front edges of the capelet panels with a narrow hem or binding.
- If you're lining the capelet, sew the lining to the hem of the outer fabric along the bottom edge.
- Press all seams and hems to give your capelet a polished look.
- Fastenings (Optional):
- You can add closure options like buttons, snaps, or ties to secure the capelet at the front.
Remember that this is a basic outline, and you may need to adjust the pattern and instructions based on your measurements and design preferences. If you're not familiar with pattern-making or sewing, it might be helpful to consult sewing tutorials or pattern-making resources for more detailed guidance.


