Creating a Hawaiian shirt, often known for its relaxed and tropical style, is a great sewing project. While I can't provide specific pattern details due to the limitations of text, I can give you a general idea of how to create a simple Hawaiian shirt pattern. You can then adjust the pattern to your desired size and style preferences.
Materials and Tools Needed:
- Pattern paper or large sheets of paper (e.g., newspaper)
- Measuring tape
- Pencil
- Ruler
- Fabric for the shirt (Hawaiian print or tropical fabric)
- Sewing machine and thread
- Buttons or snaps for closures
- Scissors, pins, and other sewing supplies
Steps to Create a Simple Hawaiian Shirt Pattern:
- Take Measurements:
- Measure the chest circumference, waist circumference, hip circumference, and desired shirt length. You'll use these measurements to create a custom pattern.
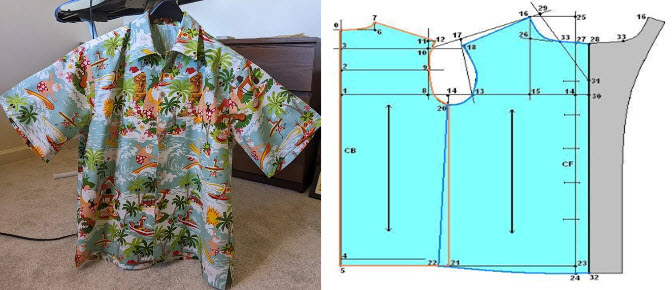
- Create the Shirt Back Pattern:
- Start by drawing a large rectangle on your pattern paper for the back of the shirt. The width should be half of your chest measurement plus some ease for comfort. The length should be the desired length of the shirt from the base of the neck to the hem.
- Neckline and Shoulder Slope:
- From the top corners of the rectangle, draw diagonal lines sloping down toward the center. This will create the slope for the shoulders.
- Add a gentle curve at the top to create the back neckline.
- Create the Shirt Front Pattern:
- Draw a second rectangle for the front of the shirt, with the same width as the back piece. The length should be the same as the back piece.
- Draw a gentle curve for the front neckline. This can be lower than the back neckline for a classic Hawaiian shirt style.
- Armhole and Side Seam:
- Starting from the outer corners of the front and back pattern pieces, draw a curved line for the armhole. This curve should extend down to create the side seam.
- Add seam allowances (usually 1/2 inch to 5/8 inch) to all edges of the back and front pattern pieces.
- Create the Collar Pattern:
- Draw a rectangle for the collar. The length should be based on your neck circumference plus some ease, and the width should be the desired collar height.
- Add seam allowances to the collar pattern.
- Sleeve Pattern (Optional):
- If you want to add sleeves, create a separate sleeve pattern. A simple rectangle with a slight curve for the armhole can be used.
- Cut and Sew:
- Pin your pattern pieces to the fabric and cut them out.
- Sew the shoulder seams, side seams, and armholes together.
- Attach the collar to the neckline.
- Hem the bottom edge of the shirt.
- Add buttons, snaps, or hook-and-loop fasteners for closure on the front.
- Optional Pocket:
- If desired, add a chest pocket to the front of the shirt.
- Final Adjustments:
- Try the shirt on to ensure a good fit, and make any necessary adjustments.
This is a basic pattern that you can customize to fit your size and style preferences. You can also add details like a pocket, contrasting fabric for the collar and cuffs, or even embellishments like coconut buttons for an authentic Hawaiian touch. Enjoy creating your custom Hawaiian shirt!


