I'd be happy to help you with a sewing pattern for palazzo pants! However, since I can't directly display images or diagrams, I'll provide you with a simplified text-based sewing pattern for palazzo pants. Keep in mind that sewing patterns can be quite detailed, so if you're new to sewing, it might be helpful to consult with a sewing expert or use online resources that offer visual instructions. Here's a basic pattern:
Materials Needed:
- Fabric of your choice (enough for the pants)
- Elastic for waistband
- Sewing machine or needle and thread
- Scissors
- Pins
- Measuring tape
Instructions:
Step 1: Take Measurements
- Measure your waist, hips, and desired length for the palazzo pants. Write down these measurements.
Step 2: Create the Pattern Pieces
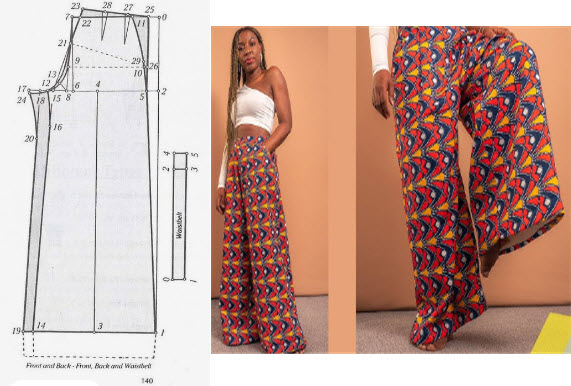
- Front and Back Panels: The front and back panels are identical rectangles. The width of each panel is your hip measurement divided by 2. The length of the panel is your desired length plus a few inches for seam allowance and hem.
- Waistband: The waistband piece should be the width of your waist measurement plus a couple of inches for overlap, and the height can be around 2-3 inches.
Step 3: Cut the Fabric
- Use the pattern pieces you've created to cut out two front panels, two back panels, and one waistband from your fabric.
Step 4: Sew the Pant Legs
- Place one front panel and one back panel right sides together. Pin along the side seam.
- Sew along the pinned edge using a straight stitch. Repeat for the other leg.
Step 5: Create the Waistband
- Fold the waistband piece in half lengthwise, right sides together.
- Sew along the short edge to create a loop.
- Turn the waistband right side out and press it flat.
Step 6: Attach the Waistband
- Pin the waistband to the top edge of the pants, aligning the raw edges.
- Sew along the pinned edge, leaving a small opening to insert the elastic.
Step 7: Insert Elastic
- Attach a safety pin to one end of the elastic and guide it through the waistband casing.
- Overlap the ends of the elastic and sew them together securely.
- Close the opening in the waistband.
Step 8: Hem the Pants
- Fold up the bottom edge of each pant leg twice to create a neat hem.
- Pin in place and sew along the folded edge.
Step 9: Finish the Pants
- Give your pants a final press with an iron to smooth out any wrinkles.
Remember that this is a basic guide, and you can customize the pattern to your preferences. If you're looking for more detailed instructions or visual aids, there are many online resources and sewing tutorials available.


