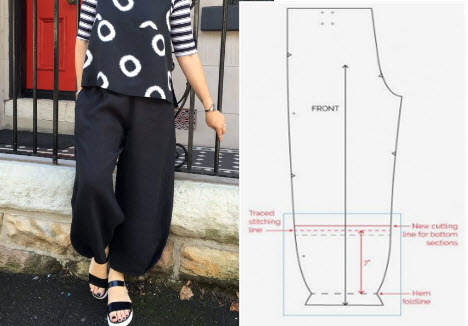
Creating a sewing pattern for lantern pants is a great way to design a comfortable and stylish garment. Lantern pants, also known as harem pants or genie pants, are characterized by their loose and billowy fit around the hips and thighs, tapering down to a tighter fit around the ankles. Here's a simple guide to help you create a lantern pants sewing pattern:
Materials:
- Measuring tape
- Large sheet of paper or pattern paper
- Pencil
- Ruler
- French curve (optional)
- Fabric of your choice
- Sewing machine and thread
Steps:
- Take Measurements: Measure the following dimensions on the person for whom you're creating the pants:
- Waist circumference
- Hip circumference
- Thigh circumference
- Inseam length (from crotch to ankle)
- Pant length (from waist to ankle)
- Create a Basic Pattern: Using a large sheet of paper, draw a rectangle for the waistband. Its width should be the person's waist circumference plus a few inches for seam allowance and comfort. The length can be your desired waistband height, usually around 2-3 inches.
- Add Hip and Thigh Measurements: From the waistband, draw two lines extending downwards at right angles. These lines should be the desired pant length. At the end of these lines, draw two curved lines connecting to the sides of the waistband. These curves represent the hips and thighs. Use the hip and thigh measurements to determine the curvature of these lines.
- Taper Downwards: From the thigh line, extend the pattern lines downwards, tapering gradually towards the ankle. The lower part of the pant leg should be narrower than the thigh portion.
- Create the Ankle Cuff: At the bottom of the pant leg lines, draw a rectangle for the ankle cuff. The width should be the person's ankle circumference plus seam allowance. The length can be around 6-8 inches, depending on the desired cuff height.
- Finalize the Inseam: Measure the inseam length on the pattern, starting from the crotch point and ending at the ankle. Draw a straight line connecting these points.
- Refine the Pattern: Use a ruler and a French curve to smooth out the lines of the pattern, ensuring a continuous and flowing shape from the waist to the ankle.
- Cut Out and Test: Cut out the pattern pieces and use them to cut your fabric. Sew the pants together, following standard sewing techniques. Don't forget to add elastic or a drawstring to the waistband for a comfortable fit.
- Try On and Adjust: Have the person try on the pants and make any necessary adjustments for fit and comfort. You may need to make slight alterations to the pattern and then transfer those changes for future use.
Remember, sewing patterns might require some trial and error to get the perfect fit. It's a good idea to create a prototype using inexpensive fabric before working with your chosen material. This way, you can refine the pattern and ensure a great final result


