Creating a pumpkin sewing pattern is a fun and creative project. Below is a simple pattern for a basic pumpkin shape. You can adjust the size and details to suit your preferences.
Materials:
- Orange fabric (for the pumpkin)
- Green fabric (for the stem)
- Stuffing material (fiberfill or cotton batting)
- Sewing machine and thread
- Scissors
- Pins
- Needle for hand sewing
- Optional: Embroidery thread for details
Pumpkin Pattern:
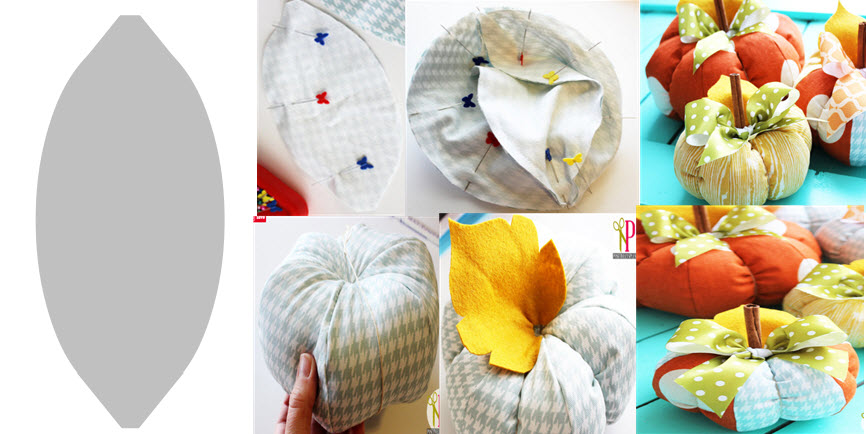
- Draw the Pumpkin Shape:
- On a piece of paper or cardboard, draw a simple pumpkin shape. It can be round or slightly elongated depending on your preference.
- Cut Out the Pattern Pieces:
- Cut out the pumpkin shape, and this will be your main pattern piece.
- Prepare Fabric:
- Fold your orange fabric in half, with the right sides facing each other.
- Pin the pattern to the fabric and cut out two pumpkin shapes, allowing for seam allowance.
- Sew the Pumpkin:
- Sew the two pumpkin pieces together, leaving an opening at the bottom for stuffing.
- Use a 1/4 to 1/2 inch seam allowance.
- Clip curves and corners to reduce bulk, but be careful not to cut into the stitching.
- Turn it Right Side Out:
- Turn the pumpkin right side out through the opening.
- Stuff the Pumpkin:
- Stuff the pumpkin with the filling until you achieve the desired plumpness.
- Make sure to stuff the corners and edges well.
- Hand Stitch the Opening:
- Hand stitch the opening closed using a ladder stitch or whip stitch.
Stem Pattern:
- Draw the Stem:
- On another piece of paper or cardboard, draw a simple stem shape. It can be a straight stem or curly, depending on your preference.
- Cut Out the Stem:
- Cut out the stem shape; this will be your stem pattern.
- Prepare Green Fabric:
- Fold your green fabric in half, with the right sides facing each other.
- Pin the stem pattern to the fabric and cut out two stem shapes, allowing for seam allowance.
- Sew the Stem:
- Sew the two stem pieces together, leaving an opening for turning.
- Turn it Right Side Out:
- Turn the stem right side out through the opening.
- Attach the Stem:
- Position the stem on top of the pumpkin where you want it.
- Hand sew the stem to the pumpkin securely.
- Optional Embroidery:
- If desired, you can add details to your pumpkin using embroidery thread. Stitch on a face, add texture, or create decorative lines.
Feel free to customize the size, shape, and details to make your pumpkin unique!


