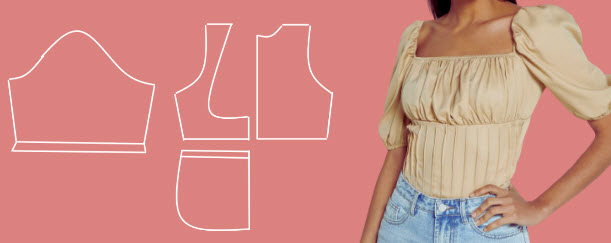
Creating a milkmaid-style top sewing pattern is relatively straightforward. This style typically features a square neckline, puffed sleeves, and a fitted bodice. Here's a basic pattern for you:
Materials Needed:
- Lightweight woven fabric (cotton, linen, etc.) in your choice of color or print
- Matching thread
- Elastic (for sleeve cuffs)
- Sewing machine or needle
- Scissors
- Pins
- Measuring tape
Pattern:
- Front and Back Bodice:
- Measure your bust circumference and add a few inches for ease and comfort.
- Divide this measurement by 2 and add seam allowances (typically ½ inch) on each side.
- Using this measurement, draw a rectangle for the front and back bodice. The width should be your calculated measurement, and the height will be the desired length of the top (usually from your underbust to your hips).
- Sleeves:
- Measure the circumference of your upper arm where you want the sleeves to end.
- Add a few inches for ease and comfort, then divide this measurement by 2.
- Add seam allowances (typically ½ inch) to both sides.
- Draw a rectangle with the width being your calculated measurement and the height being the desired length of the sleeves (puffed part).
Assembly:
- Front and Back Bodice:
- Cut out two rectangles using your front and back bodice pattern. These will be the front and back pieces of the top.
- With right sides together, sew the side seams of the front and back pieces.
- Sleeves:
- Cut out two rectangles using your sleeve pattern.
- Hem one of the long edges of each sleeve piece (this will be the cuff end).
- Sleeve Gathering:
- Create gathering stitches along the non-hemmed long edge of each sleeve. This can be done by setting your sewing machine to the longest stitch length and sewing two rows of stitches, leaving long thread tails at both ends.
- Sleeve Attachment:
- Pull the thread tails of the gathering stitches to gather the sleeve until it matches the armhole's circumference.
- Pin the gathered edge of the sleeve to the armhole of the bodice, right sides together.
- Sew the sleeve to the bodice, easing in the gathers as you go.
- Square Neckline:
- Measure the distance between your shoulder points and subtract a couple of inches for a comfortable neckline width.
- Draw a square neckline on the front bodice, starting a few inches from the shoulder seam and curving down to the center front. Repeat for the back bodice.
- Elastic Cuffs:
- Measure your wrist circumference and cut elastic about an inch shorter than that measurement.
- Attach the elastic to the hemmed edge of each sleeve using a zigzag stitch on your sewing machine or by hand-stitching.
- Finish:
- Fold the top in half, right sides together, and sew the side seams.
- Hem the bottom edge of the top.
- Finishing Touches:
- Press all the seams to give a neat finish to your top.
- Try on the top to make sure the fit is comfortable and the neckline is as desired.
Remember, this is a basic pattern. Feel free to add your creative touches by experimenting with fabric choices, adding trims, or adjusting the design elements to match your personal style. Always tailor the pattern to your measurements for the best fit.


