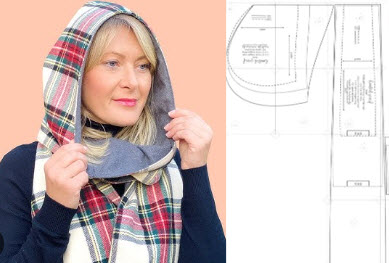
Creating a hooded scarf is a fun and useful project, especially during the colder months. Below, I'll provide a simple sewing pattern for a basic hooded scarf. Please note that sewing patterns can be adjusted based on personal preferences and measurements, so feel free to modify it as needed.
Materials Needed:
- Warm fabric (fleece, wool, or other suitable material)
- Scissors
- Sewing machine (or needle and thread if sewing by hand)
- Pins
- Measuring tape
Instructions:
- Measurements:
- Determine the length you want for the scarf. Measure from the back of your neck down to your desired length for the scarf. Add a few extra inches (around 6-8 inches) for the hood part.
- Decide on the width of the scarf. A typical width is around 6-10 inches, depending on personal preference and the fabric's thickness.
- Cutting the Fabric:
- Using the measurements from step 1, cut a rectangular piece of fabric according to your desired length and width. This will be the main body of the scarf.
- Cut another rectangular piece for the hood. The length should be the same as the width of the main body, and the width should be around 18-20 inches.
- Hemming:
- Hem all four sides of both the main body and the hood. Fold the edges over about ¼ inch and sew them down to prevent fraying.
- Attaching the Hood:
- Fold the hood piece in half lengthwise with the right sides facing each other.
- Sew along the open edge to create a tube. This will be the back of the hood.
- Turn the hood right side out.
- Align the open edge of the hood with one end of the main body of the scarf, making sure the right sides are facing each other.
- Pin the hood to the scarf, then sew them together.
- Completing the Hooded Scarf:
- Once the hood is securely attached, fold the scarf in half lengthwise with the right sides facing each other.
- Pin along the open edge of the scarf, leaving a small opening (about 4-5 inches) in the middle for turning the scarf right side out.
- Sew along the pinned edge, securing the main body and the hood together. Remember to leave the small opening unstitched.
- Carefully turn the scarf right side out through the opening.
- Hand-stitch or machine-stitch the opening closed.
- Final Touches:
- Check all the seams to ensure they are secure.
- Optionally, you can add decorative elements like buttons, tassels, or patches to personalize your hooded scarf.
That's it! Your hooded scarf is now ready to keep you warm and cozy during chilly days. Remember to adjust the measurements and details as needed to suit your style and preferences. Happy sewing!


