Creating a pattern for men's shorts involves a few steps and measurements. Below, I'll provide a basic outline for drafting a pattern for a pair of simple men's shorts. You can customize the pattern to your desired length and style.
Materials:
- Large sheet of paper (pattern paper or newspaper)
- Pencil
- Ruler
- Measuring tape
- Fabric of your choice
- Scissors
- Sewing machine or needle and thread
- Elastic (optional)
- Button or snap (optional)
Instructions:
1. Take Measurements:
- Measure the following:
- Waist circumference
- Hip circumference
- Desired length of the shorts (from waist to hem)
- Inseam length (from crotch to hem)
- Width of one thigh (measure around the widest part of one thigh)
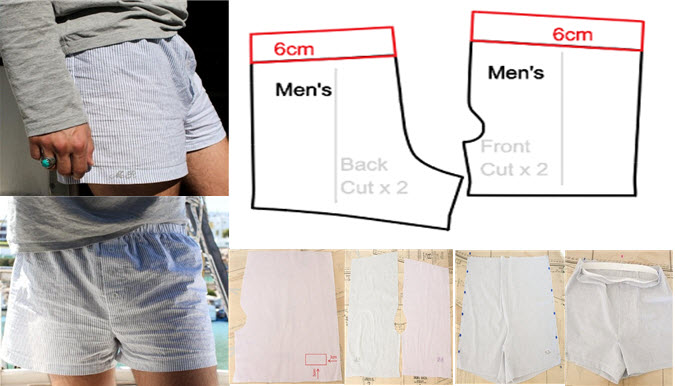
2. Create the Front Panel:
- Fold your large sheet of paper in half lengthwise to create a crease down the center. This crease represents the center front (CF) of your shorts.
- On the folded edge, mark half of your waist measurement plus some ease for comfort. This will be the width of the front panel at the waist.
- Measure down from the folded edge the length you desire for the shorts. Mark this point.
- Draw a horizontal line at the waist width mark and another at the length mark.
- To create the crotch curve, measure down from the waist width mark the inseam length and mark this point.
- Connect the waist width mark and the inseam mark with a slightly curved line to form the front panel. The curve should be gradual.
- To create the hem, measure from the inseam mark to the length mark, and draw a straight line across the bottom.
- Cut out the front panel along the lines, leaving the folded edge uncut.
3. Create the Back Panel:
- To create the back panel, trace the front panel pattern, omitting the curve for the crotch. The back panel will be slightly wider than the front panel to accommodate the hips.
- Add seam allowances (usually 1/2 inch or more) to the side and inseam edges of both the front and back panels.
4. Cut the Fabric:
- Pin the front and back panel patterns to your fabric, making sure to cut two pieces of each panel.
5. Sew the Shorts:
- With right sides together, sew the side seams of the front and back panels.
- Finish the raw edges with a zigzag stitch or serger to prevent fraying.
- Fold and press a small hem along the bottom edge of each leg of the shorts.
- To create the waistband, fold the top edge of the shorts down about 1 inch (or as needed for your elastic or drawstring) and sew, leaving an opening to insert elastic or a drawstring.
6. Add Elastic or Drawstring (Optional):
- If you're using elastic, cut a piece of elastic to your waist measurement, thread it through the waistband, and sew the ends together.
- If you prefer a drawstring, cut a piece of drawstring cord and sew two small buttonholes on the front waistband. Thread the drawstring through the buttonholes.
7. Add Closure (Optional):
- You can add a button, snap, or hook-and-eye closure at the waistband to secure the shorts.
8. Try On and Make Adjustments:
- Try on the shorts to ensure a good fit. Make any necessary adjustments to the waistband, length, or side seams.
Your basic men's shorts are now complete and ready to wear! Customize them with your choice of fabric and any additional details or pockets you desire.


