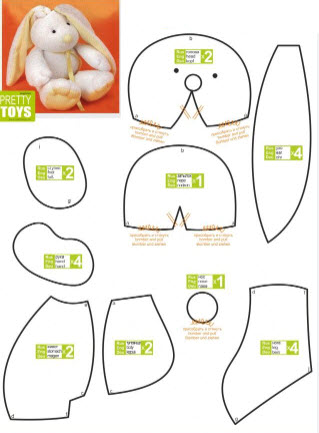
I can definitely provide you with a simple text-based sewing pattern for a basic stuffed bunny. Here's a basic template for you to follow:
Materials Needed:
- Fabric of your choice (for body and ears)
- Thread
- Scissors
- Sewing machine or needle for hand sewing
- Stuffing material (polyfill, cotton, etc.)
- Embroidery floss or thread (for eyes and nose)
- Pins
- Optional: ribbon, buttons, or other embellishments
Instructions:
Step 1: Cutting the Fabric
- Cut two bunny body shapes from your chosen fabric. You can use a simple oval shape with slightly elongated ears for a cute look.
- Cut four bunny ear shapes from the same or coordinating fabric.
Step 2: Sewing the Bunny Body
- Place the two body fabric pieces together with the right sides facing each other.
- Pin around the edges to secure the pieces in place.
- Using a sewing machine or hand stitching, sew around the edges of the body, leaving a small opening for turning and stuffing.
Step 3: Sewing the Bunny Ears
- Pair up the ear fabric shapes to create two sets of two.
- Place the ear pairs together with the right sides facing each other.
- Stitch around the edges of the ears, leaving the straight edge open for turning.
- Carefully trim any excess fabric from the curved edges.
Step 4: Turning and Stuffing
- Turn the body and ears right side out through the openings.
- Stuff the body and ears with your chosen stuffing material until they are plump and soft.
- Hand stitch the openings closed using a ladder stitch for an invisible closure.
Step 5: Attaching Ears and Adding Features
- Position the ears on top of the body, slightly overlapping the head area. Pin them in place.
- Stitch the base of the ears securely to the body.
- Use embroidery floss or thread to sew on eyes and a nose. You can use French knots for the eyes and a small stitched triangle for the nose.
Step 6: Finishing Touches
- If desired, you can add a small ribbon bow around the bunny's neck or sew on buttons for decoration.
- Your stuffed bunny is now complete and ready to be enjoyed!
Feel free to modify the size, shape, and features of the bunny to create your desired look. This is a simple pattern, so don't hesitate to get creative and add your personal touches!


