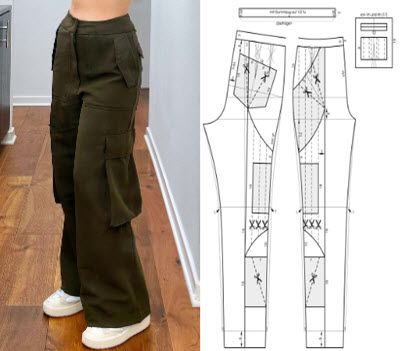
Creating a cargo pants sewing pattern involves drafting pattern pieces that capture the utilitarian style of cargo pants. Here's a guide on how to create a basic cargo pants pattern:
Materials Needed:
- Medium-weight fabric (cotton twill, canvas, etc.)
- Sewing machine
- Thread
- Scissors
- Measuring tape
- Pins
- Pattern paper or large pieces of paper
- Pencil or pen
- Buttons or closures
- Optional: Interfacing for waistband and pocket flaps
Steps:
- Take Measurements: Measure your waist, hips, inseam (inner leg length), and desired pant length.
- Drafting the Pattern: Create a basic pattern using your measurements and the following steps:
Front Piece:
- Draw a vertical line representing the center front (CF) of your pants pattern.
- From the top, mark down the length of the pants.
- Measure your waist measurement divided by 4 and mark it on the waist level.
- From the waist mark, measure down to your hip measurement divided by 4 and mark it.
- Connect the waist and hip marks with a slightly curved line.
- Add seam allowances to the sides, waist, and inseam (usually 1/2 to 1 inch).
Back Piece:
- Use the front piece as a reference for the waist and hip measurements.
- Repeat the steps for the back piece, adjusting the back curve slightly for a better fit.
- Add seam allowances to the sides, waist, and inseam.
- Pockets:
- Create pocket patterns for the cargo pockets. These are typically rectangular with a flap. The size and placement are up to your preference.
- Add seam allowances around the pocket edges and the flap.
- Cutting the Fabric:
- Pin the pattern pieces onto your fabric and cut them out. Be sure to cut two front pieces (mirrored), two back pieces (mirrored), and the pocket pieces.
- Interfacing (if needed):
- Apply interfacing to the waistband, pocket flap, and any other areas that need structure and stability.
- Sewing:
- Sew the front pieces together at the center front seam and the back pieces together at the center back seam, leaving the crotch area open.
- Sew the inseams and side seams of the pants, aligning the edges of the fabric. Press the seams open or to one side.
- Pockets:
- Sew the cargo pockets according to your pattern, usually attaching them to the front legs. Fold the pocket flap over the pocket and sew in place.
- Waistband:
- Sew the waistband pieces together, leaving an opening for inserting elastic or a drawstring.
- Attach the waistband to the top of the pants, right sides together, matching the center back seam of the waistband with the center back seam of the pants.
- Fold the waistband over the seam allowances and stitch it down, leaving the opening for elastic or a drawstring.
- Elastic or Drawstring Waist:
- Insert elastic through the waistband casing using a safety pin or thread a drawstring through the casing.
- Overlap the elastic ends and stitch them securely together if using elastic.
- Close the opening in the waistband.
- Hemming:
- Hem the bottom of the pants by folding the fabric twice and sewing in place.
- Try On and Adjust:
- Try on the pants to ensure a comfortable fit. Make any necessary adjustments to the length or fit before finishing the seams and trimming excess fabric.
- Finishing Touches:
- Attach any additional buttons, closures, or embellishments as desired.
- Trim any loose threads, press the seams, and make sure the cargo pants are comfortable and well-finished.
Remember that cargo pants have distinctive pocket details, so you can customize the number and placement of pockets based on your preferences. Additionally, the choice of fabric can significantly influence the final look and feel of the pants.


