Creating a sleep sack sewing pattern involves drafting a design, cutting fabric, sewing, and ensuring the safety of the final product. Here's a general guide to help you make a basic sleep sack sewing pattern:
Materials You Might Need:
- Lightweight fabric suitable for sleepwear (cotton, flannel, muslin)
- Thread
- Sewing machine or needle
- Scissors
- Measuring tape
- Zippers, snaps, or buttons (for closures)
- Optional: Interfacing for reinforcement
Steps:
- Measurements and Sizing: Decide on the size of the sleep sack you want to make. Measure the length from the baby's shoulder to the feet and the width at the widest part of the baby's body. Make sure to leave room for movement and growth.
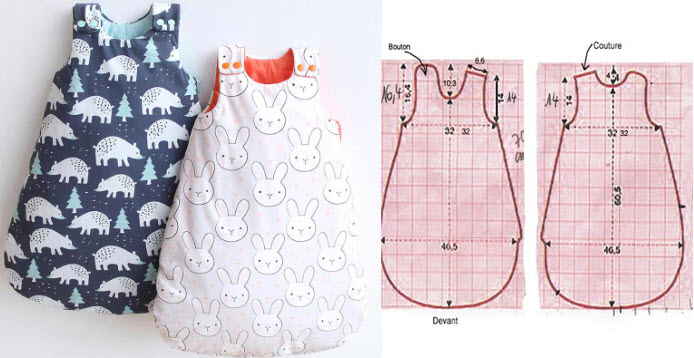
- Drafting the Pattern:
- Front and Back Panels: Draw a rectangular shape for the front and back panels of the sleep sack. The width should be slightly wider than the baby's body measurement, and the length should be the desired length of the sleep sack.
- Neck Opening: Mark a U-shaped curve at the top of the front panel for the neck opening. The depth of the curve will depend on the baby's size.
- Sleeve Openings: Along the sides of the front and back panels, mark openings for the baby's arms. These openings can be curved or rectangular.
- Cutting the Fabric:
- Cut two identical front and back panels from the fabric.
- If you're using a zipper or other closure, you may need to cut a strip of fabric for the zipper placket.
- Sewing the Sleep Sack:
- Place the front and back panels right sides together. Pin and sew the side seams and shoulder seams, leaving the neck and arm openings open.
- Finish the edges of the arm and neck openings with bias binding or facing for a neat finish.
- Adding the Closure:
- If using a zipper: Sew the zipper placket onto the front panel where the sleep sack opens. Attach the zipper, and sew the other side of the zipper placket to the back panel.
- If using snaps or buttons: Attach the closures to the front and back panels at the shoulders and sides.
- Hemming:
- Hem the bottom edge of the sleep sack.
- Try It On: Test the sleep sack to make sure the arm openings and neck opening are comfortable for the baby.
- Embellishments (Optional): You can add decorative trims, appliqués, or embroidery if desired.
- Safety Considerations:
- Avoid using small buttons or decorations that could become a choking hazard.
- Ensure that closures are securely attached to prevent any potential hazards.
- Washing Instructions:
- Keep in mind that sleepwear for babies should be easily washable. Choose fabrics that are suitable for frequent washing.
- Final Touches: Press the seams and edges to give your sleep sack a polished look.
- Safety Testing: Ensure that the sleep sack is safe for the intended baby's age and developmental stage. Follow sleep safety guidelines recommended by pediatric experts.
Remember that safety is paramount when creating sleep sacks for babies. Follow recommended sleep safety guidelines, and make sure all closures are secure. Always feel free to customize the pattern to meet your preferences and the baby's needs.


