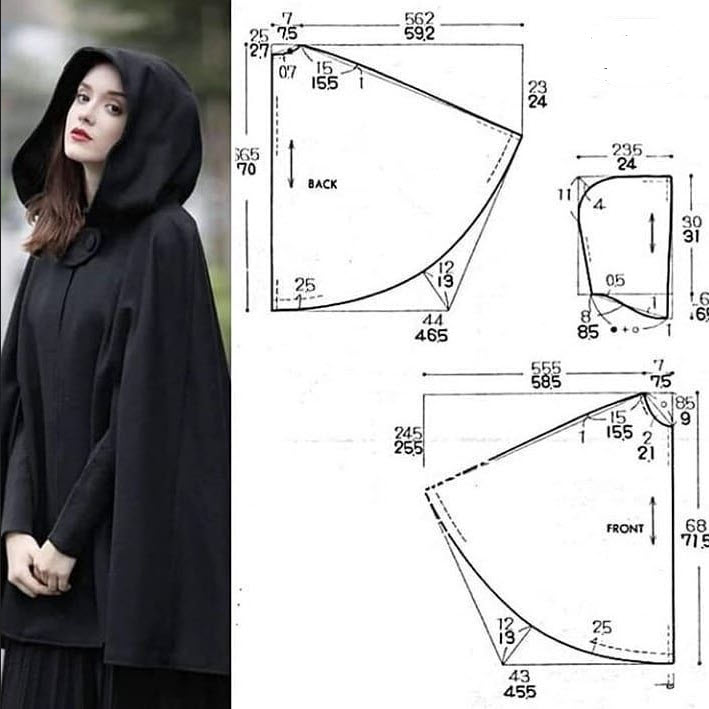
Creating a cloak sewing pattern is a straightforward process, and you can customize it based on your preferences. Here's a basic pattern for a simple cloak:
Materials:
- Fabric of your choice (wool, fleece, velvet, or any other desired fabric)
- Measuring tape
- Scissors
- Sewing machine or needle and thread
- Pins
- Ribbon or cord for closure (optional)
Instructions:
- Measurements: First, you'll need to take some measurements.
- Measure from the base of your neck (where the cloak will hang) to the length you want the cloak to be. This will be the length of your cloak.
- Measure the distance from the base of your neck to the fullest extension of your outstretched arm. This will be the radius of your cloak, and it will determine how wide the cloak is when you spread your arms.
- Cutting the Fabric:
- Fold your fabric in half so that the selvage edges (finished edges) are aligned.
- Mark the length measurement from step 1 on the folded edge of the fabric.
- Measure and mark the radius measurement from step 1 on the same folded edge. This should create a quarter-circle pattern when unfolded.
- Cut the fabric along these marks. You'll end up with a quarter-circle of fabric.
- Hemming:
- Hem the straight edge (the one that was cut) by folding the edge over about 1/2 inch (1.27 cm) and then folding it over again, so the raw edge is hidden. Sew along the fold to secure the hem.
- Optional Hood:
- If you want to add a hood to your cloak, you can cut out a hood shape from the remaining fabric, typically a half-moon shape. The size of the hood will depend on your preference.
- Hem the curved edge of the hood.
- Attaching the Hood (if applicable):
- Fold the straight edge of the hood over and sew it to the top edge of the cloak, aligning the center of the hood with the center of the cloak.
- Closure (optional):
- If you want to add a closure, you can sew a ribbon or cord along the front edges of the cloak. This will allow you to tie the cloak closed.
- Try On and Adjust: Put on the cloak and adjust the length and fit as needed. You can trim the bottom edge if it's too long and make any necessary alterations to the hood or neckline.
- Final Finishing:
- Finish any remaining edges, such as the neckline or hood, with a hem or bias tape if desired.
This basic pattern is just a starting point, and you can customize it in various ways. You can choose different fabrics, add embellishments, or create a more elaborate hood design. Be creative and make your cloak uniquely yours.


