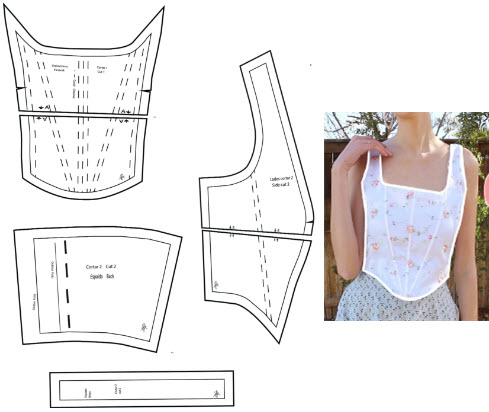
Creating a sewing pattern for a corset top involves several steps and considerations. Here's a basic guide to help you get started:
Materials Needed:
- Pattern paper or muslin fabric
- Measuring tape
- Pencil or fabric marking tool
- Ruler
- Scissors
- Fabric of your choice
- Boning (plastic or steel)
- Lacing or buttons for closure
- Sewing machine and thread
- Grommets (if using lacing)
- Bias tape or binding
Steps:
- Measurements: Take accurate measurements of your bust, waist, and hips. Measure the distance from your underbust to your waist, as well as your desired corset length. These measurements will be the basis for your pattern.
- Create the Base Pattern:
- Draw a vertical line on your pattern paper, which represents the center front (CF) of the corset.
- Measure and mark the bust, waist, and hip measurements from the CF line.
- Create the neckline and armhole curves by sketching the desired shapes. Keep in mind that corsets typically have a sweetheart or straight neckline.
- Extend the pattern downward to your desired corset length.
- Dart Placement:
- Corset tops often have darts for shaping. To create darts, measure the distance between your bust points (nipples) and mark them on the pattern.
- From each bust point, draw a dart leg towards the bust apex. The length and width of the dart depend on your desired fit.
- Create Panels:
- Divide the corset pattern into panels. Commonly, corsets have front and back panels, and sometimes side panels.
- You can create additional panels for design or fit purposes.
- Add Seam Allowance:
- Add seam allowance (usually around 1/2 inch) to all edges of your pattern. This is the extra fabric you'll need for sewing the pieces together.
- Cutting the Fabric:
- Pin your pattern pieces onto your fabric and cut them out. Be sure to cut the correct number of pieces as per your pattern design.
- Boning Channels:
- Corsets use boning to provide structure and support. Create channels for boning by sewing lines along the seam allowances on the wrong side of your fabric pieces.
- Insert boning into these channels. You can sew channels directly onto the fabric or create separate channels using bias tape.
- Assembly:
- Sew the panels together, right sides facing each other. Start with the center front and work your way around.
- Attach the lining if desired. Corsets can be lined to hide raw edges and provide additional comfort.
- Closures:
- Add closures like lacing or buttons. If using lacing, insert grommets along the back edges for lacing holes.
- If using buttons, sew buttonholes and attach buttons to one side of the corset, while creating loops on the other side.
- Finishing:
- Trim any excess fabric, clip curves, and press your seams.
- Bind the top and bottom edges with bias tape for a clean finish.
- Try on the corset and make any necessary adjustments for fit.
Remember that sewing a corset requires some sewing experience, especially due to the fitting intricacies and potential for discomfort if not well-fitted. You might find commercial corset patterns or online tutorials helpful as well. Always take safety precautions when working with corset closures and boning.


