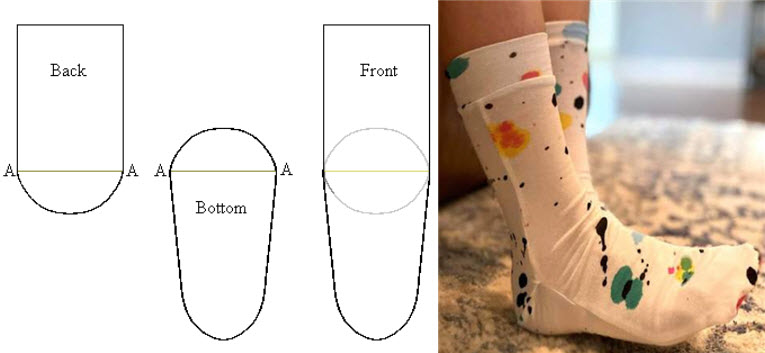
Creating a sock sewing pattern involves a few key steps. Keep in mind that this is a basic pattern, and you may need to adjust it based on your specific measurements and preferences. Additionally, it's recommended to use stretchy fabric, such as knit, for socks. Here's a simple pattern for a basic ankle sock:
Materials:
- Stretchy knit fabric (about 1/4 to 1/2 yard, depending on size)
- Sewing machine or needle and thread
- Pins
- Scissors
- Paper for pattern
Instructions:
- Measurements:
- Measure the circumference of your ankle and the widest part of your foot.
- Measure the length from the back of your heel to the desired height of the sock.
- Create a Pattern:
- Draw a rectangle for the body of the sock. The width should be half the circumference of your ankle plus some extra for stretch (add about 1 inch for ease). The height of the rectangle should be the desired length of your sock, plus seam allowance.
- Draw a curve at the top of the rectangle to shape the cuff. This can be a gentle curve for ankle socks or a more pronounced curve for crew socks.
- Cut the Fabric:
- Fold your fabric in half, right sides facing each other.
- Pin the pattern to the fabric and cut around it, leaving seam allowance on all sides.
- Sew the Sock:
- Sew along the side of the sock, forming a tube. Use a stretch stitch or a narrow zigzag stitch to allow the fabric to stretch.
- If you have a serger, you can use it to finish the raw edges. Otherwise, you can use a zigzag stitch on a regular sewing machine.
- Attach the Cuff:
- If you want a folded cuff, fold the top edge of the sock down to the desired height and sew it in place.
- Alternatively, you can cut a separate cuff piece, fold it in half lengthwise, and attach it to the top of the sock.
- Finish the Toe:
- To shape the toe, fold the sock in half with wrong sides facing each other.
- Sew along the curve at the front of the foot, leaving a small opening for turning the sock right side out.
- Turn Right Side Out:
- Reach inside the sock through the toe opening and pull the fabric through to turn the sock right side out.
- Close the Toe Opening:
- Sew the small opening at the toe closed using a hand stitch or a sewing machine.
- Try On and Adjust:
- Try on the sock and make any necessary adjustments to the fit.
Remember, this is a basic pattern, and you may need to refine it based on your preferences and measurements. Feel free to experiment with different fabrics, lengths, and styles to create the perfect sock for you.


