Creating a sewing pattern for a bear is a fun and creative project. Below, I'll provide you with a basic outline for a simple teddy bear sewing pattern. Feel free to customize it to your liking and add any additional details or accessories you desire.
Materials Needed:
- Teddy bear fabric (plush, felt, or any soft fabric of your choice)
- Thread (matching the fabric)
- Stuffing material (polyester fiberfill)
- Safety eyes or buttons for eyes (if preferred)
- Sewing machine or needle and thread
- Scissors
- Pins
- Bear pattern template (you can find these online or draw your own)
Instructions:
- Prepare Your Materials:
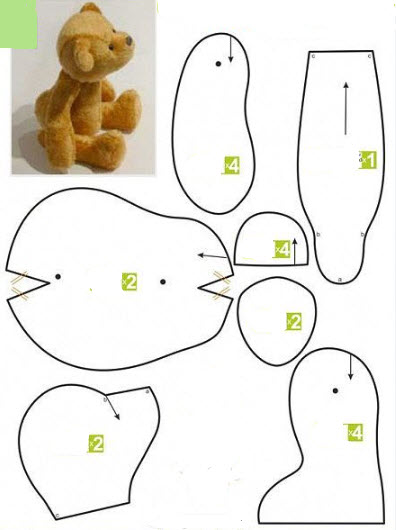
- Cut out the bear pattern pieces from your chosen fabric. You should have two body pieces, two arms, two legs, and one head. Be sure to cut them with the fabric's right sides facing each other so that you have a mirror image of each piece.
- If you're using safety eyes, attach them to the head piece following the manufacturer's instructions.
- Sew the Arms and Legs:
- Take one arm piece and fold it in half with the right sides facing each other. Sew along the curved edge, leaving the straight edge open. Repeat for the second arm and both legs.
- Turn the arms and legs right side out, and stuff them lightly. You don't want them to be too firm; just enough to give them shape.
- Sew the Head:
- Take the two head pieces and sew them together along the curved edge, leaving the bottom open.
- Turn the head right side out and stuff it to your desired level of firmness.
- Sew the Body:
- Take one of the body pieces and position the arms and legs where you want them to be. Place the head on top, making sure it's centered.
- Carefully pin the pieces in place.
- Lay the second body piece on top, right sides facing in.
- Sew around the edge of the body, leaving a small opening at the bottom for turning and stuffing.
- Turn the bear right side out.
- Stuff the Bear:
- Start by filling the head and body with stuffing, making sure to shape the bear as you go.
- Then, stuff the arms and legs, again shaping them as you fill.
- Make sure the bear is evenly stuffed and has the desired firmness.
- Close the Bottom:
- Hand stitch the small opening at the bottom of the bear to close it securely.
- Finishing Touches:
- You can add details like a nose and mouth with embroidery thread if desired.
- Feel free to personalize your bear with ribbons, bows, or other accessories.
- Enjoy Your Teddy Bear:
- Your handmade teddy bear is now complete and ready to be cherished or given as a gift.
Remember that this is a basic pattern, and you can modify it to create different sizes and styles of teddy bears. Feel free to get creative with different fabrics, colors, and embellishments to make your bear unique.


