Creating a pea coat sewing pattern involves careful measurements and attention to detail. Here's a simplified guide to help you create a basic pea coat pattern:
Materials:
- Pattern paper or regular paper
- Ruler
- Pencil or pen
- Measuring tape
- Tailor's chalk or marking tool
Steps:
- Measurements:
- Bust, waist, and hip circumferences
- Shoulder width
- Back neck to waist length
- Arm length
- Chest width (measured around the fullest part of the chest)
- Coat length (desired length of the coat)
- Cross back measurement (shoulder seam to shoulder seam across the back)
- Drafting the Pattern:
Front and Back Bodice:
- Draw a vertical line on your paper, representing the center front (CF) and center back (CB) lines.
- Mark the bust point and waist point along the CF line.
- Measure and mark half of the chest width from the CF line to the left and the right. These points will be the chest points.
- Measure and mark half of the hip circumference from the CF line to the left and the right. These points will be the hip points.
- Connect the points to create the outer edges of the front and back bodice.
- Measure and mark the desired coat length from the CB line to create the bottom edge of the coat.
Collar:
- Draw a rectangle with the width of the collar and the length of your back neckline measurement.
Sleeves:
- Draw a horizontal line, representing the top of the sleeve.
- Measure and mark the desired sleeve length from this line.
- Measure the armhole on the front and back bodice patterns to determine the sleeve cap length.
- Divide the sleeve cap length in half and mark this point on the top edge of the sleeve pattern.
- Draw a gentle curve connecting the sleeve length point to the sleeve cap point.
- Cutting the Pattern:
- Cut out the front and back bodice pattern pieces, collar, and sleeves.
- Using the Pattern:
- Pin the pattern pieces onto your fabric and cut the corresponding pieces. Remember to add seam allowances to all edges.
- Sewing:
- Sew the front and back bodice pieces together at the shoulder seams.
- Attach the collar to the neckline.
- Sew the sleeves into the armholes, easing the sleeve cap if necessary.
- Sew the side seams of the bodice and sleeves.
- Lining (Optional):
- Repeat the above steps to create a lining pattern for the coat.
- Sew the lining pieces together, leaving an opening for turning.
- Attach the lining to the coat at the neckline and front edges, right sides facing.
- Finishing:
- Hem the bottom edge of the coat and the sleeves.
- Add buttons or closures along the front of the coat.
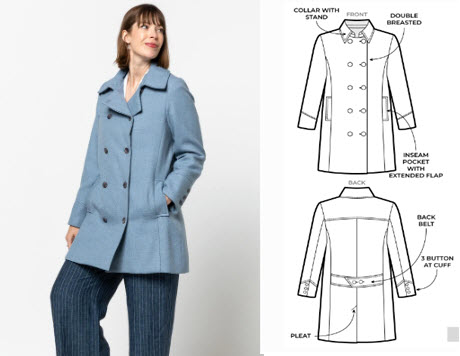
Remember that pea coats often have double-breasted fronts and may include features like pockets and a vent at the back. Adding these details can enhance the authenticity of your pea coat design. Additionally, if you're new to sewing or pattern-making, consider using commercial sewing patterns as a starting point or seeking guidance from more detailed resources or tutorials specific to pea coats.


