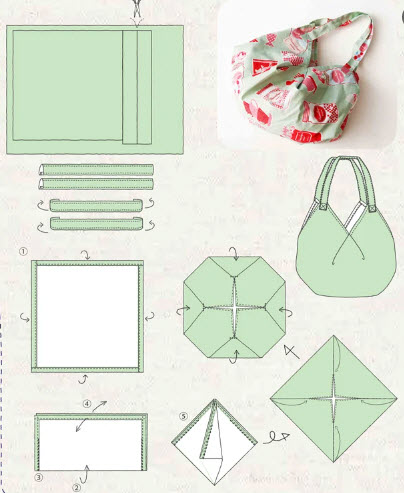
Creating a hobo bag through sewing is a fun project that results in a stylish and versatile accessory. Here's a basic sewing pattern you can use to make a simple hobo bag:
Materials Needed:
- Main fabric (canvas, denim, etc.)
- Lining fabric (cotton, polyester, etc.)
- Fusible interfacing (for added structure, if desired)
- Matching thread
- Sewing machine or needle if hand-sewing
- Scissors
- Pins
- Magnetic snap or button for closure
- Iron
Instructions:
1. Prepare the Pattern: Create a pattern using the following dimensions. These can be adjusted based on your preferences.
- Main Body: 18" x 15"
- Strap: 42" x 4"
You can round the corners of the main body piece if you prefer a softer look.
2. Cut the Fabric: Using your pattern, cut the main body piece from both the main fabric and the lining fabric. If you're using fusible interfacing, cut a piece for the main body as well.
3. Apply Interfacing (Optional): If you're using interfacing, follow the manufacturer's instructions to fuse it to the wrong side of the main fabric main body piece. This will add structure to your bag.
4. Sew the Strap: Fold the strap piece in half lengthwise with the right sides together. Sew along the long edge using a ½" seam allowance. Turn the strap right side out and press it flat.
5. Attach the Strap: Position the strap ends on the top edge of the main fabric main body piece, about 3-4 inches from each side. Pin the strap in place. Make sure the strap isn't twisted. Sew across the top edge to secure the strap.
6. Sew the Bag: Place the main fabric main body piece right sides together with the lining fabric main body piece. Pin along the sides and bottom edges. Sew along the sides and bottom using a ½" seam allowance, leaving the top open.
7. Box the Corners (optional but gives the bag more depth): Similar to the lunch bag instructions, fold each corner of the bag so that the side seam aligns with the bottom seam, creating a triangle. Measure about 2-3" from the tip of the triangle and draw a line perpendicular to the seam. Sew along this line. Trim the excess fabric. Repeat for all corners.
8. Attach the Closure: If you're using a magnetic snap, follow the manufacturer's instructions to attach it to the lining fabric near the top edge. If you prefer a button closure, sew a button on the main fabric side and create a loop with a small piece of fabric on the flap.
9. Finish the Bag: Turn the bag right side out. Press the seams and the top edge for a clean finish. If desired, topstitch around the top edge for added durability and a polished look.
Your simple hobo bag is now complete! This design is open and roomy, perfect for everyday use. Remember to customize the size, fabric, and closure method to suit your preferences. Ironing as you work will help you achieve a professional result. Enjoy your handmade hobo bag!


