Creating a sewing pattern for a dragon can be a complex and detailed process, but I can provide you with a simplified outline for a basic dragon plushie. Please note that this is a simplified version, and you can customize it to your liking by adding more details, scales, or features.
Materials You'll Need:
- Green, red, or your chosen fabric for the dragon body
- A sewing machine or hand-sewing supplies
- Scissors
- Pins
- Polyfill stuffing
- Needle and thread
- Safety eyes or buttons (for the eyes)
- Paper and pencil for creating the pattern
Steps to Create a Simple Dragon Sewing Pattern:
- Design Your Dragon: Start by sketching the shape and size of your dragon on a piece of paper. Decide on the body shape, wings, tail, and other features. Keep it simple, especially if this is your first time making a plushie.
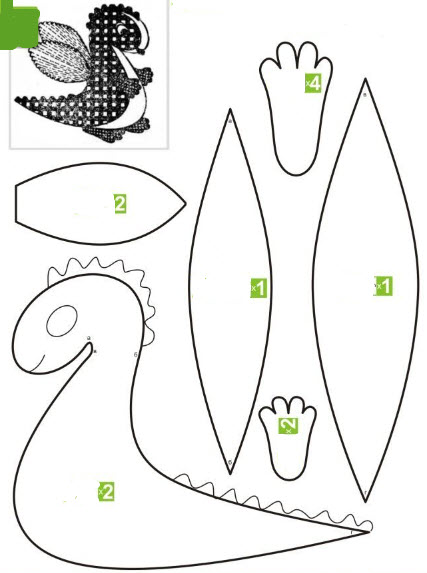
- Create a Pattern: Divide your dragon sketch into simple geometric shapes (circles, triangles, rectangles) to make it easier to translate into a sewing pattern. Create separate patterns for the body, wings, tail, and any additional features like horns or spikes. Remember to add seam allowances (typically 1/4 inch) to your pattern pieces.
- Cut Fabric: Use your patterns to cut out the corresponding pieces from your chosen fabric. You should have two identical body pieces, two wing pieces, two tail pieces, and any additional pieces you want for features.
- Assemble Body: Place the two body pieces together with the right sides facing each other and pin them together. Sew around the edges, leaving a small opening for turning and stuffing. Turn the body right side out.
- Add Features: Sew on any additional features like horns, spikes, or ears to the dragon's body. You can also attach safety eyes or buttons for the eyes.
- Assemble Wings and Tail: For the wings and tail, sew the pieces right sides facing each other, leaving a small opening for turning. Turn them right side out, stuff them lightly, and sew the openings closed.
- Attach Wings and Tail: Sew the wings to the sides of the dragon's body and the tail to the back.
- Stuff Your Dragon: Use polyfill stuffing to fill your dragon plushie. Make sure to stuff it firmly, but not so tight that it distorts the shape.
- Finish the Dragon: Hand-sew the opening on the dragon's body closed.
- Final Touches: Add any final details like facial features or scales using embroidery thread or fabric paint.
Remember, this is a basic guideline, and you can get creative with your dragon by adding more details, changing colors, or altering the size and shape. Sewing can be a fun and rewarding hobby, so don't be afraid to experiment and make your dragon unique.


