Creating a rabbit sewing pattern involves drafting or finding a suitable pattern and then sewing the pieces together. Below is a basic outline of how to create a simple rabbit plushie sewing pattern and sew it together.
Materials You'll Need:
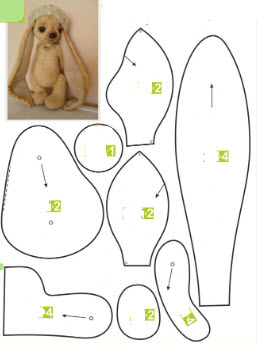
- Rabbit pattern template (You can draw your own or find one online).
- Fabric (felt, fleece, or any suitable fabric for plushies).
- Scissors.
- Sewing machine or hand-sewing needles.
- Thread.
- Pins.
- Stuffing material (polyfill or cotton batting).
- Safety eyes or buttons (for eyes, optional).
- Embroidery floss (for nose and mouth, optional).
- Ribbon or fabric scraps (for a bow, optional).
Steps to Create and Sew a Rabbit Plushie:
1. Create the Pattern:
- Draw or find a rabbit pattern template that you like. You can find templates online or in sewing books. Ensure it includes pieces for the body, ears, and any other desired features.
- Adjust the size of the template if needed by enlarging or reducing it. Trace the template onto paper and cut out the pieces.
2. Cut the Fabric:
- Lay your fabric out on a flat surface, ensuring it's well-ironed.
- Pin your pattern pieces to the fabric and cut out the required number of pieces. You should have two mirror-image body pieces, two mirror-image ear pieces, and any additional features like arms, legs, or a tail if desired.
3. Sew the Features:
- If you're adding any facial features like eyes, nose, or mouth, do this before sewing the body pieces together. You can use safety eyes, buttons, or embroider the features using embroidery floss.
- Sew the ears (if they are separate pieces) by sewing along the curved edge, leaving the straight edge open. Turn them right-side out and press them flat.
4. Assemble the Rabbit:
- Place the two body pieces together with the right sides facing each other. Pin them in place.
- If you're adding arms, legs, or a tail, sandwich these pieces between the two body pieces at the appropriate locations.
- Sew around the edges, leaving an opening for turning and stuffing. Use a 1/4-inch (6 mm) seam allowance.
- Clip notches along the curved seams to help the fabric lay flat when turned.
5. Turn and Stuff:
- Turn the rabbit right-side out through the opening.
- Stuff the rabbit with polyfill or cotton batting, ensuring you fill all areas evenly and achieve the desired level of firmness. Use a dowel or chopstick to help distribute the stuffing.
6. Close the Opening:
- Hand-sew the opening closed using a ladder stitch or slip stitch. Ensure it's securely closed.
7. Add the Ears:
- Hand-sew the ears onto the top of the rabbit's head.
8. Add Any Optional Features:
- If you want to add a bow around the rabbit's neck, sew it in place using ribbon or fabric scraps.
9. Final Touches:
- Give your rabbit plushie a final inspection to ensure all seams are secure and any optional features are properly attached.
With these steps, you can create a basic rabbit plushie. Feel free to personalize your rabbit by choosing different fabrics, colors, and sizes or by adding additional features like clothing or accessories.


