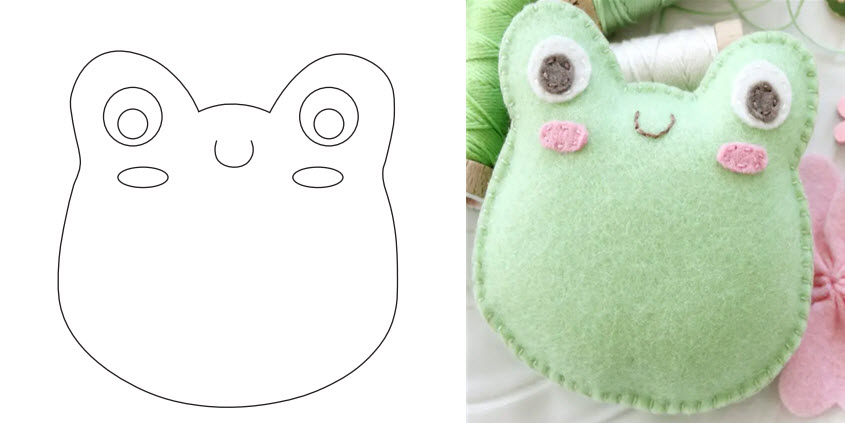
Creating a frog sewing pattern involves designing the shape of the frog, creating templates, and providing step-by-step instructions for sewing the pieces together. While I can't provide images, here's a basic outline of how you might create a simple stuffed frog sewing pattern:
Materials Needed:
- 4″ (10cm) x 8″ (20cm) rectangle of green wool felt
- Embroidery needle
- Six stranded embroidery floss (separated into two strands) to match the colours of your felt
- Small, short blade scissors for cutting felt
- polyester p stuffing
- 4″ (10cm) x 6″ (15cm) rectangle of freezer paper
- 4″ (10cm) square of fine paper like tissue paper
Pattern Creation:
Design and Measurements:
-
- Draw the shape of the frog on paper. This will include the body and head.
- Determine the size you want the finished frog to be. This will help you scale the pattern appropriately.
Body :
-
- Cut two identical body shapes from green fabric.
Eyes:
-
- Cut two large circles from white or yellow fabric for the eyes.
- Cut two smaller circles from black fabric or felt for the pupils.
- Cut two cheek shapes in pink felt
Attaching Eyes:
- Position the eyes on the frog's head and pin them in place.
- Sew the eyes to the head using small stitches around the outer edges of the eyes.
Stuffing and Closing:
- Stuff the body of the frog with polyfill until it's as firm as you'd like.
- Hand-sew the opening closed using a slip stitch or ladder stitch.
Final Touches:
- You can add details like a smile or mouth using embroidery thread.
Remember that the instructions provided here are quite basic, and the actual pattern would likely include more specific measurements, templates, and detailed sewing instructions. If you're new to pattern-making or sewing, it could be helpful to consult sewing tutorials, books, or online resources to learn more about creating sewing patterns and assembling stuffed animals.


