Creating a beanie sewing pattern is a fun and relatively simple project, even for beginners. Here's a basic sewing pattern for a beanie:
Materials Needed:
- Stretchy knit fabric (e.g., jersey, fleece, or rib knit)
- Measuring tape
- Fabric scissors
- Sewing machine
- Thread
- Pins
- Beanie pattern template (drawn or printed on paper)
Steps:
- Measure Your Head:
- Measure the circumference of the head where the beanie will sit. This measurement will be crucial to determine the width of your beanie.
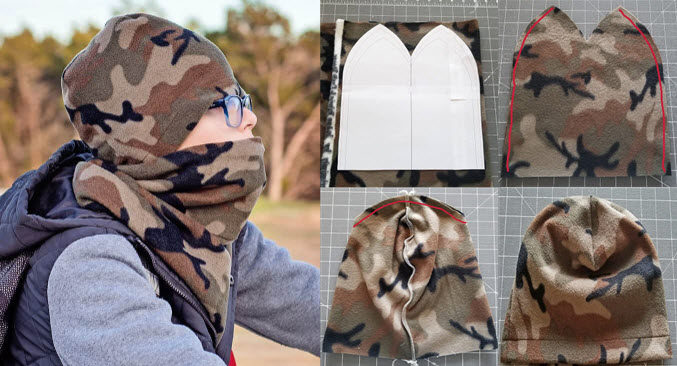
- Create Your Beanie Pattern:
- To create a basic beanie pattern, you'll need a rectangle. The width of the rectangle should be half of the head circumference measurement plus seam allowance (usually 1/2 inch or 1.25 cm). The height of the rectangle can be your desired beanie height.
- Fold the fabric in half with the right sides facing each other. Place the pattern template on the fabric, aligning the long edge of the template with the fabric fold. Pin it in place.
- Cut Out the Beanie:
- Cut out the fabric along the edge of the template, leaving a seam allowance around the edges. You should have two identical pieces when you unfold the fabric.
- Pin and Sew the Beanie:
- With the right sides facing each other, pin the two pieces of fabric together along the curved edge (the top of the beanie).
- Use a stretch stitch on your sewing machine (a narrow zigzag or a serger if available) to sew the curved edge together, about 1/4 inch (0.6 cm) from the edge. Leave the bottom (the straight edge) open.
- Finish the Bottom Edge:
- Fold the bottom edge of the beanie up by about 1 inch (2.5 cm) to create a hem. You can fold it more if you want a thicker cuff. Pin it in place.
- Sew the Hem:
- Using a stretch stitch, sew along the hem's edge, about 1/4 inch (0.6 cm) from the folded edge. This will secure the hem and prevent fraying.
- Turn the Beanie Right Side Out:
- Flip the beanie right side out so that the seam is on the inside.
- Optional Embellishments:
- You can add decorative elements like pom-poms, fabric patches, or embroidery to personalize your beanie.
- Try It On:
- Try on your beanie to ensure it fits comfortably. If it's too loose, you can adjust the width or the length of your pattern for your next beanie.
- Trim Excess Threads:
- Trim any loose threads for a clean finish.
Congratulations! You've now created a basic beanie sewing pattern. You can experiment with different fabrics, colors, and sizes to make a variety of beanies for yourself or as gifts. As you gain more experience, you can customize your patterns further, such as adding a lining or creating more intricate designs.


