Creating a basket sewing pattern can be a delightful and versatile project. You can make baskets of different shapes and sizes using fabric, rope, or other materials. Below is a step-by-step guide to creating a basic fabric basket pattern.
Materials Needed:
- Large sheet of paper (pattern paper or large tracing paper)
- Pencil
- Measuring tape
- Ruler
- Fabric (for the basket exterior and lining)
- Interfacing (optional, for added stability)
- Sewing machine and thread
- Scissors
- Pins or clips
Instructions:
1. Determine the Basket Size: Decide on the dimensions of the basket you want to create. You can make it square, rectangular, round, or oval. Measure the following dimensions:
- Length
- Width
- Height
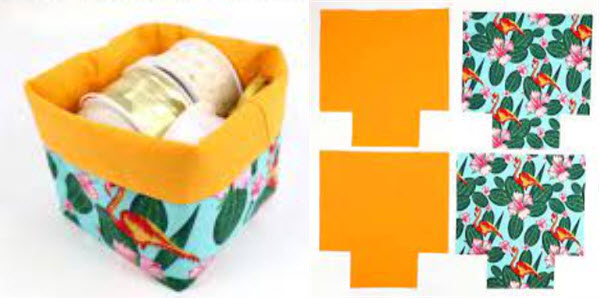
2. Create the Pattern:
- On the paper, draw a rectangle using the length and width measurements. This rectangle represents the base of the basket.
- From each corner of the rectangle, draw lines upward to represent the height of the basket. This will create a box shape for the basket.
3. Add Seam Allowance:
- Add a seam allowance (usually ⅝ inch) to all sides of the pattern, except for the top edge where the basket will be finished.
4. Optional: Add Interfacing:
- If you want your basket to be more structured, you can cut interfacing using the same pattern and iron it onto the wrong side of the exterior fabric pieces.
5. Cut the Fabric:
- Pin the pattern to your exterior fabric and lining fabric, and cut out the fabric pieces. You should have two sets of pieces – one for the exterior and one for the lining.
6. Sew the Exterior:
- With right sides together, sew the corners of the exterior fabric to form the box shape. You'll have a rectangular or square shape with four seams.
7. Sew the Lining:
- Repeat the process for the lining fabric to create a separate lining box.
8. Create the Handles (Optional):
- Cut two strips of fabric for the handles, or you can use webbing or rope.
- Fold each strip in half lengthwise, with right sides together, and sew along the long edge.
- Turn the handles right side out and press them flat.
9. Attach the Handles (Optional):
- Position the handles on the exterior of the basket and pin them in place. Make sure they are evenly spaced and secure.
- Sew the handles to the exterior fabric securely.
10. Assemble the Basket:
- Place the exterior fabric with the right side facing out inside the lining, with the right side facing in. Match up the top edges and the side seams.
- Pin or clip the two layers together along the top edge.
11. Sew the Top Edge:
- Sew along the top edge, leaving a small opening (about 4 inches) for turning the basket right side out.
12. Turn the Basket:
- Reach through the opening and pull the exterior fabric through to turn the basket right side out.
- Push out the corners and edges to make the basket shape crisp and neat.
13. Finish the Basket:
- Hand-sew or machine-stitch the opening closed.
- Press the top edge to make it smooth and even.
Congratulations! You now have a fabric basket that you can use for various purposes, such as storage, organizing, or even as a gift basket. Feel free to get creative with fabric choices, add embellishments, or experiment with different shapes and sizes to suit your needs and style. Happy sewing!


