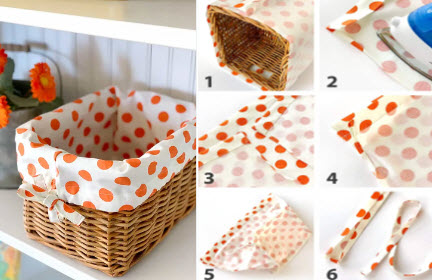
Making a basket liner is a fun and practical sewing project. It helps protect the contents of the basket and adds a touch of style to your storage solution. Here's a step-by-step guide to create a basic basket liner pattern.
Materials Needed:
- Large sheet of paper (pattern paper or large tracing paper)
- Pencil
- Measuring tape
- Ruler
- Basket for measuring
Instructions:
1. Measure the Basket:
- Place your basket on a flat surface and measure the following dimensions:
- Length: Measure from one side to the other, across the longest part of the basket.
- Width: Measure from the front to the back of the basket, across the widest part.
- Height: Measure from the bottom to the top edge of the basket.
2. Create the Pattern:
- On the paper, draw a rectangle using the basket's length and width measurements. This rectangle represents the bottom of the basket liner.
- From each corner of the rectangle, draw lines upward to represent the height of the basket. This will create a box shape.
- Decide how much you want the liner to hang over the sides of the basket (e.g., 1 inch) and add this measurement to each side of the box shape. Extend the lines accordingly to create the liner's sides.
- If your basket has handles or other protrusions, mark those on the pattern and adjust the lines accordingly.
3. Add Seam Allowance:
- Add a seam allowance (usually ⅝ inch) to all sides of the pattern, except for the top edge where the liner will be finished.
- If you plan to have a hem at the top, add extra allowance to accommodate the hem fold.
4. Cut and Test the Pattern:
- Cut out the pattern along the outermost lines.
- Pin the pattern to your fabric and cut out the fabric following the pattern edges.
- Place the fabric liner inside the basket and check the fit. Make any necessary adjustments to the pattern.
5. Finish the Basket Liner:
- Sew the side seams of the liner, right sides together, using a straight stitch or a serger. Leave the top edge open if you plan to add a hem, or if you're using a fabric that won't fray, you can leave the top edge as is.
- If you're adding a hem, fold the top edge inward by your desired hem width and press it. Then, sew the hem in place.
- If your liner has handles or other protrusions, make small slits in the fabric at those points to allow the liner to fit snugly around them.
6. Insert the Liner:
- Once the liner is finished, place it inside the basket, adjusting it so it fits neatly and covers the sides and bottom.
- If desired, fold the top edge of the liner over the basket's rim for a more finished look.
Congratulations! You now have a practical and stylish basket liner to keep your belongings organized and add a touch of charm to your home decor. Feel free to get creative by using different fabrics and adding embellishments or pockets to the liner to suit your preferences. Happy sewing!


