Creating a simple owl sewing pattern can be a delightful and creative project. Here's a basic outline for a stuffed owl plushie sewing pattern:
Materials:
- Fabric of your choice (for the body, wings, and beak)
- Fabric scraps or felt for eyes and feet
- Thread
- Sewing machine or needle and thread
- Stuffing material (polyfill)
- Scissors
- Pins
- Buttons or beads for eyes (optional)
- Embroidery floss or fabric paint for embellishments (optional)
Instructions:
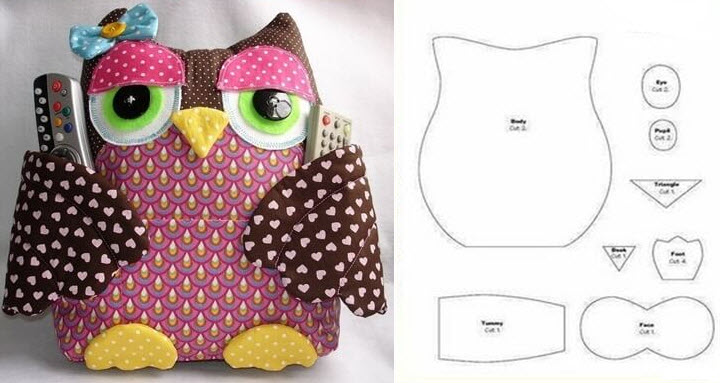
1. Create the Pattern:
- Draw an owl shape on a piece of paper to use as your pattern. You can make it as simple or intricate as you like. A basic owl shape typically consists of a round body with two wings, a beak, and two feet. Remember to leave a seam allowance (usually 1/4 inch) around the edges.
- Cut out the pattern pieces, and you'll have templates for the body, wings, beak, and feet.
2. Cut the Fabric:
- Place the body template on your chosen fabric (usually a soft and cuddly material) and cut out two identical pieces for the front and back of the owl.
- Cut two wing pieces, one beak, and two feet pieces from contrasting or coordinating fabrics.
- If you want to add a decorative chest piece, cut a small, oval-shaped piece from a different fabric.
3. Sew the Owl:
- Place the two body pieces right sides together and sew around the edges, leaving a small opening for turning.
- Repeat the same process for the wings, beak, and feet, leaving an opening for turning in each.
- Trim the excess fabric at the curved edges of the wings, beak, and feet to reduce bulk when turning.
4. Turn and Stuff:
- Turn all the fabric pieces right side out through the openings.
- Stuff the body of the owl with polyfill until it reaches your desired level of plumpness. Use a pencil or the back of a paintbrush to help distribute the stuffing evenly.
- Lightly stuff the wings, beak, and feet as well.
5. Close the Openings:
- Hand-sew the openings closed on the body, wings, beak, and feet using a ladder stitch or slip stitch.
6. Assemble the Owl:
- Position the wings on the sides of the owl body and hand-sew them in place.
- Attach the beak just below the eyes, and secure it with stitches.
- Sew the feet to the bottom of the owl, either side by side or slightly staggered.
7. Add Eyes and Embellishments:
- You can use buttons, beads, or fabric circles for the owl's eyes. Sew them in place or use fabric glue to attach them.
- If desired, add decorative embroidery or fabric paint for details like feathers or a chest pattern.
8. Finish and Customize:
- You can personalize your owl by adding extra embellishments like a ribbon bow, a felt heart, or any other decorations you like.
Your stuffed owl plushie is now complete and ready to cuddle or display! Feel free to experiment with different fabrics, colors, and sizes to create a variety of adorable owls.


