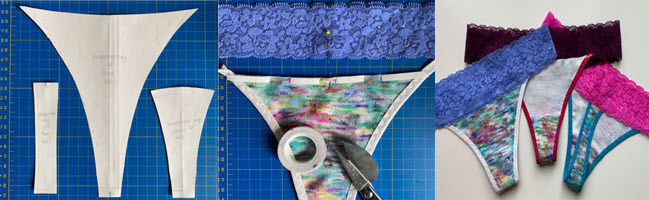
Creating a sewing pattern for a thong can be quite straightforward, but it's important to remember that sewing lingerie requires attention to detail and precise stitching. Here's a basic outline of how you could create a thong sewing pattern:
Materials You'll Need:
- Tracing paper or pattern paper
- Ruler
- Pencil or pen
- Fabric of your choice (stretchy fabric like jersey or lace is common for lingerie)
- Elastic (for waistband and leg openings)
- Sewing machine and thread
Steps:
- Measurements: Measure the following:
- Waist circumference
- Hip circumference
- Front and back rise (distance from waist to crotch)
- Desired width of the thong back
- Drafting the Pattern:
- Draw a rectangle on your pattern paper for the front piece. Its width should be slightly less than half of your hip measurement, and the height should be the desired rise plus a little extra for seam allowance.
- Draw a rectangle for the back piece. Its width should be slightly less than your desired thong back width and the height can match the front piece height.
- Draw a gentle curve connecting the top corners of the back piece rectangle. This curve will be the waistband of the thong.
- Measure and draw a curved line along the leg openings on both the front and back pieces.
- Cutting Out the Fabric:
- Cut two front pieces on the fold of your fabric.
- Cut two back pieces on the fold as well.
- Cut elastic for the waistband and leg openings. Measure your waist and leg openings, then cut the elastic about 80-90% of these measurements.
- Sewing:
- Place the front pieces right sides together and sew along the curved leg openings using a stretch stitch (zigzag or stretch stitch on your sewing machine).
- Repeat the process for the back pieces.
- Attach the front and back pieces at the crotch seam and sew.
- Elastic:
- Sew the ends of the waistband elastic together to form a loop.
- Pin the waistband elastic along the curved waist edge of the thong, stretching it slightly as you sew. This will create a snug fit.
- Pin and sew the leg opening elastic to the leg openings in the same manner.
- Finishing:
- Trim any excess fabric or elastic.
- Turn the thong right side out and give it a final press with an iron.
Remember that creating lingerie requires practice to get the fit and finish just right. It's a good idea to use inexpensive fabric for your first attempt to save your nicer materials for when you're more confident in your sewing skills. Additionally, consider finding online tutorials or resources specifically for sewing lingerie, as they can provide more in-depth guidance and tips for achieving a professional finish.


