Creating a bustier through sewing can be a fun and stylish project. Bustiers are fitted garments that provide shaping and support to the upper body. While I can't provide specific patterns, I can guide you on how to find bustier sewing patterns online. If you're interested in drafting your own bustier sewing pattern, here's a general guide:
Materials You Might Need:
- Pattern paper or large sheets of paper
- Pencil, eraser, and ruler
- Fabric for the bustier (such as cotton, satin, or brocade)
- Lining fabric
- Boning (plastic or steel)
- Thread
- Sewing machine and hand-sewing needles
- Busk or closures (hooks and eyes, lacing)
Steps:
- Measurements and Sizing: Take accurate measurements of your bust, waist, and hips to determine your size.
- Design and Sketch: Draw a sketch of your bustier design, including the front and back views, neckline, and any additional details.
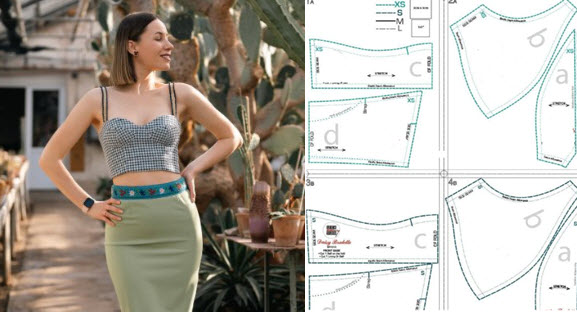
- Draft the Pattern:
- Front and Back Panels: Start with the front and back panels. Use a fitted bodice block as a foundation and modify it to create the bustier shape. Adjust darts, curves, and lengths as needed.
- Side and Princess Seams: Create panels for side and/or princess seams, which allow for a more fitted and shapely garment.
- Cup and Bust Support: If you want to incorporate cups or bust support, create cup patterns that fit your measurements. You might also add boning channels for structure.
- Lining and Boning Channels: Draft patterns for the lining of the bustier and channels for inserting boning. Boning provides support and structure.
- Closure and Back Opening: Plan the closure for the back of the bustier. This could be a busk closure, lacing, or hooks and eyes.
- Cutting the Fabric:
- Cut the outer fabric pieces based on your drafted patterns.
- Cut the lining fabric using the same patterns.
- Sewing the Bustier:
- Sew the outer fabric panels together, following your pattern and design.
- Sew the lining panels together, leaving an opening to insert boning.
- Boning and Structure:
- Insert boning into the channels on the lining.
- Consider adding underwire or cups for additional support and shaping.
- Closures and Fastenings:
- Attach the chosen closure (busk, hooks and eyes, lacing) to the back of the bustier.
- Finishing Touches:
- Hem the bottom edge of the bustier.
- Add any desired embellishments like lace, trims, or appliqués.
- Try It On: Test the fit of the bustier and make any necessary adjustments.
- Pressing and Steaming: Press the seams and edges to achieve a polished appearance.
- Enjoy Your Bustier: Once you're satisfied with the fit and look of your handmade bustier, it's ready to be worn and enjoyed.
Please note that creating a bustier is a complex sewing project that demands a good understanding of garment construction and tailoring techniques. If you're new to sewing or unfamiliar with creating fitted garments, consider seeking assistance from a professional dressmaker or seamstress. Always prioritize fit, comfort, and safety when making garments that closely fit the body.


