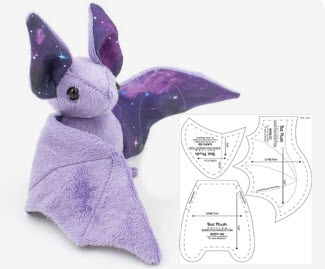
Creating a bat pattern for sewing can be a fun and creative project. Here's a simple pattern to make a basic stuffed bat plushie. You can adjust the size and add details to suit your preferences.
Materials Needed:
- Black fabric (for the bat body)
- White or colored fabric (for the bat eyes)
- Stuffing or polyester fiberfill
- Scissors
- Sewing machine and thread
- Sewing pins or clips
- Hand-sewing needle
- Black embroidery floss or thread (for mouth and nose)
- Optional: Bat wing template (you can draw one or find one online)
Instructions:
1. Create the Bat Body Pattern:
- On a large sheet of paper, draw the shape of the bat body. You can create a simple silhouette with an elongated oval shape for the body and two larger semi-circles at the top for the wings. Make sure to add seam allowances around the edges.
2. Create the Bat Wing Pattern:
- If you're using a template, trace the wing shape onto the paper. Otherwise, draw one freehand on the paper, making sure it fits the bat body and has a slight curve to resemble a bat wing.
3. Cut the Fabric:
- Pin the bat body pattern to the black fabric and cut two bat body shapes.
- Pin the bat wing pattern to the black fabric and cut four wing shapes.
4. Sew the Bat Wings:
- Take two wing shapes and place them together with the right sides facing each other.
- Sew around the edges, leaving a small opening for turning.
- Turn the wings right side out through the opening and press them flat.
- Repeat this process with the other two wing shapes.
5. Attach the Wings to the Body:
- On the backside of each bat body shape, position two wings facing downward (towards the bottom of the body).
- Pin the wings in place and sew them onto the bat body along the top curved edge.
6. Sew the Bat Body:
- With right sides together, place the two bat body pieces on top of each other.
- Pin or clip the edges together, leaving a small opening (about 3-4 inches) for turning the bat right side out and stuffing it.
7. Sew the Bat Body:
- Sew around the edges of the bat body using a straight stitch, leaving the opening unsewn.
8. Turn the Bat:
- Reach through the opening and pull the bat right side out.
- Push out the edges and corners to make the bat shape crisp and neat.
9. Add Facial Features:
- Cut two small circles from white or colored fabric for the eyes.
- Hand-sew the eyes onto the front of the bat body.
- Using black embroidery floss or thread, sew a small mouth and a nose (or any desired facial features) onto the bat.
10. Stuff and Finish the Bat:
- Fill the bat with stuffing or polyester fiberfill until it reaches your desired level of firmness.
- Hand-sew the opening closed using a ladder stitch or any other invisible stitching method.
Congratulations! You now have a cute stuffed bat plushie. Feel free to experiment with different fabrics, sizes, and additional details to create unique and charming bat plushies for decorations or gifts. Happy sewing!


