Creating a sewing pattern for an axolotl plushie can be a fun and adorable project. Here's a simple guide to help you get started:
Materials needed:
- Soft fabric (such as fleece or minky) in the desired colors for the axolotl
- Thread in matching colors
- Scissors
- Pins
- Sewing machine (or you can hand sew if you prefer)
- Stuffing material (polyfill or fiberfill)
- Safety eyes (optional)
- Embroidery floss or fabric markers (for facial details, optional)
Step 1: Designing the pattern
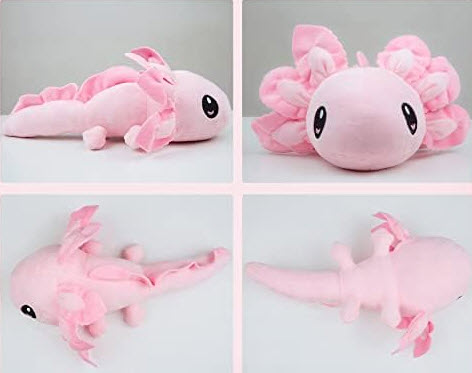
- Start by sketching out the shape of the axolotl plushie on paper. You can refer to images of axolotls to capture their unique features, such as their external gills and short limbs.
- Break down the shape into simple geometric pieces, such as circles, ovals, and rectangles. This will make it easier to create a pattern.
- Transfer the pattern pieces onto pattern paper or trace them directly onto the fabric using a fabric marker.
Step 2: Cutting the fabric
- Pin the pattern pieces onto the fabric and cut around them, making sure to cut two mirror image pieces for each body part (except for the gills).
Step 3: Sewing the plushie
- Take two body pieces (one mirror image of the other) and place them together with the right sides facing each other. Pin them in place.
- Using a sewing machine or hand sewing, stitch along the edges of the body pieces, leaving a small opening for turning and stuffing. Be sure to leave the edges of the gills open as well.
- Carefully trim any excess fabric and clip curved edges to allow for smooth turning.
- Turn the body piece right side out through the opening. Use a pencil or a chopstick to gently push out the corners and edges for a crisp shape.
- Stuff the body firmly with the stuffing material, making sure to distribute it evenly.
- Close the opening by stitching it closed using a ladder stitch or a whip stitch.
Step 4: Attaching the gills and facial details
- Take the gill pieces and sew them together along the curved edges, leaving the straight edges open.
- Turn the gills right side out and stuff them lightly.
- Attach the gills to the side of the axolotl's head, positioning them appropriately.
- Use embroidery floss or fabric markers to add the facial details, such as eyes, a smile, and any other desired features.
Step 5: Finishing touches
- If you're using safety eyes, insert them into the appropriate positions on the face.
- Take your time to shape and position the axolotl plushie as desired. You can bend the limbs, adjust the gills, and shape the body to give it a lifelike appearance.
Remember, this is a basic guide to creating an axolotl sewing pattern. Feel free to modify the design and add your own creative touches. Enjoy making your adorable axolotl plushie!


