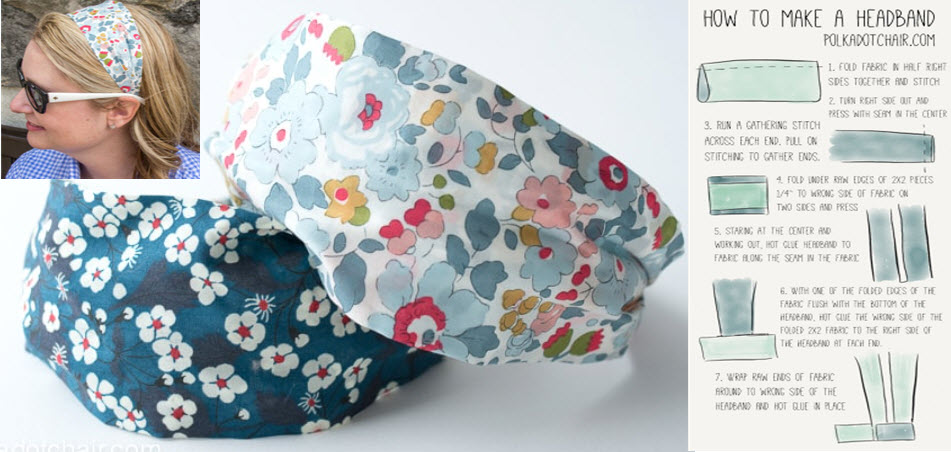
Certainly! Below is a simple pattern for a basic headband. You can adjust the measurements based on your head size and desired width of the headband.
Materials:
- Fabric of your choice
- Sewing machine or needle and thread
- Elastic (optional)
Instructions:
- Measurements:
- Measure around your head where you want the headband to sit.
- Decide on the width of your headband (common widths are around 2 to 4 inches).
- Cutting the Fabric:
- Cut two rectangles from your fabric. The length should be the head circumference measurement plus 1 inch for seam allowance. The width should be double the desired width of your headband plus 1 inch for seam allowance.
Example: If your head circumference is 22 inches and you want a 3-inch wide headband, cut two rectangles that are 23 inches long and 7 inches wide (22 + 1 for seam allowance, 3 x 2 + 1 for seam allowance).
- Sewing:
- Place the two fabric pieces right sides together.
- Sew along the long edges with a 1/2 inch seam allowance, leaving the short edges open.
- If you have a sewing machine, use a straight stitch. If hand-sewing, use a running stitch.
- Trim and Turn:
- Trim the excess fabric from the seam allowances.
- Turn the headband right side out. You can use a pencil or chopstick to gently push out the corners.
- Closing the Ends:
- Fold in the raw edges of the open ends and stitch them closed. You can either hand-sew or machine-sew.
- Optional Elastic Insert:
- If you want the headband to have a snug fit, you can insert a piece of elastic into the open ends before stitching them closed.
- Measure the elastic around your head comfortably and insert it into the open ends before sewing them shut.
- Finishing:
- Give the headband a final press with an iron to make it neat.
- You can embellish the headband further by adding bows, buttons, or other decorations if desired.
Feel free to customize the pattern based on your preferences and style. Happy sewing!


