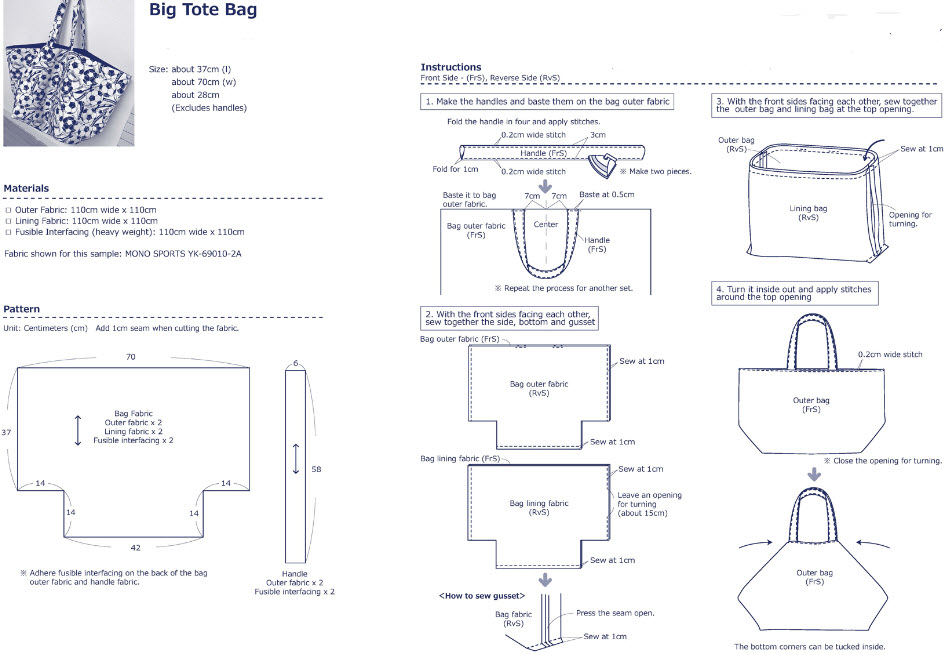
Creating a simple tote bag sewing pattern is a great project for beginners. Below is a basic pattern that you can follow. Adjust the measurements based on your preferences for the size of the tote bag.
Materials:
- Fabric (about 1 yard for the exterior and 1 yard for the lining)
- Matching thread
- Sewing machine
- Scissors
- Iron
- Pins
- Fabric marker or chalk
Instructions:
Step 1: Cut Fabric Pieces 1.1. Cut two rectangles from the exterior fabric for the main body of the tote. These will be the front and back panels. A common size is 15 inches by 16 inches.
1.2. Cut two rectangles from the lining fabric using the same dimensions as the exterior panels.
1.3. Cut two strips for the handles. These are usually around 4 inches wide and 24 inches long.
Step 2: Sew the Handle Straps 2.1. Fold each handle strip in half lengthwise, right sides facing each other.
2.2. Sew along the long edge, leaving the short ends open.
2.3. Turn the handles right side out. You can use a safety pin or a turning tool for this.
2.4. Press the handles flat with an iron.
Step 3: Attach the Handles to the Exterior Panels 3.1. Place the exterior panels right side up.
3.2. Position the handles on each panel, about 2-3 inches from the side edges.
3.3. Pin the handles in place and sew them securely. You may sew a square or an "X" shape for added strength.
Step 4: Sew the Exterior Panels 4.1. Place the exterior panels right sides together.
4.2. Pin the sides and bottom edges.
4.3. Sew along the sides and bottom, leaving the top open.
4.4. Clip the corners to reduce bulk.
Step 5: Box the Corners 5.1. With the bag still inside out, flatten one corner so that the side seam aligns with the bottom seam, creating a triangular shape.
5.2. Measure about 2 inches from the tip of the triangle and mark a line.
5.3. Sew along this line, perpendicular to the side and bottom seams.
5.4. Trim the excess fabric.
5.5. Repeat for the other corner.
Step 6: Sew the Lining 6.1. Repeat Steps 4 and 5 with the lining fabric, but leave a small opening in the bottom for turning the bag later.
Step 7: Attach the Lining to the Exterior 7.1. Turn the exterior of the bag right side out.
7.2. Place the lining inside the exterior, with right sides together.
7.3. Match up the top edges and seams, then pin in place.
7.4. Sew around the top edge.
7.5. Turn the bag right side out through the opening in the lining.
Step 8: Finish the Bag 8.1. Hand-sew or machine-stitch the opening in the lining closed.
8.2. Push the lining into the bag and press the top edge.
Congratulations! You've completed a simple tote bag. Feel free to customize the design by adding pockets, embellishments, or using different fabrics.


