Certainly! Here's a simple sewing pattern for a bi-fold wallet:
Materials you'll need:
- Fabric of your choice (outer fabric and lining fabric)
- Interfacing (optional for added stability)
- Thread
- Scissors
- Sewing machine (or you can sew by hand)
- Velcro or snap fasteners (for closure)
- Ruler
- Pins or clips
Instructions:
- Start by cutting out your fabric pieces:
- Outer fabric: Cut two rectangles measuring 7 inches by 4 inches.
- Lining fabric: Cut two rectangles measuring 7 inches by 4 inches.
- Interfacing: Cut two rectangles measuring 7 inches by 4 inches (optional).
- If you're using interfacing, apply it to the wrong side of both outer fabric pieces following the manufacturer's instructions.
- Place one outer fabric piece right side up on your work surface. Align one lining fabric piece on top of it, right sides together. Pin or clip them in place. Repeat this for the other set of outer fabric and lining fabric.
- Sew along the long edges of both fabric sets, leaving a 1/2 inch seam allowance. Backstitch at the beginning and end to secure the stitches.
- Trim the seam allowance to reduce bulk, being careful not to cut through the stitching.
- Turn both fabric sets right side out and press them flat with an iron. Make sure the corners are pushed out for a crisp finish.
- Topstitch along the long edges of both fabric sets, about 1/4 inch from the edge. This will help the wallet maintain its shape and add a decorative touch.
- Place the two fabric sets on top of each other, aligning the outer fabric pieces and the lining fabric pieces. The right sides of the outer fabric should be facing each other, as well as the lining fabric.
- Pin or clip the edges together, making sure to match the corners and sides.
- Sew around the edges of the wallet, leaving a small opening (about 2-3 inches) on one side of the lining fabric for turning.
- Trim the corners of the fabric to reduce bulk, being careful not to cut through the stitching.
- Turn the fabric right side out through the opening. Use a pointed object to push out the corners for a crisp finish.
- Press the wallet flat, making sure to fold in the raw edges of the opening.
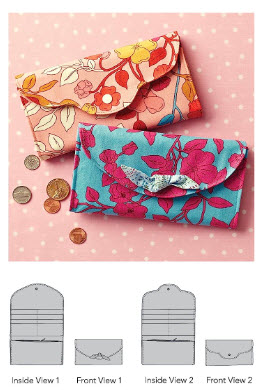
- Decide where you want the closure to be and attach the Velcro or snap fasteners accordingly. This could be on the flap of the wallet or the main body, depending on your design preference.
- Fold the wallet in half, and your handmade wallet is ready to use!
Remember, you can customize the pattern by adding card slots, a coin pocket, or any other features to suit your needs. Have fun and enjoy your sewing project!


