Creating a sewing pattern for a simple dog shirt is a fun and practical project. You can make a shirt for your furry friend to keep them warm, protect their skin, or just add a touch of style. Here's a basic pattern for a dog shirt:
Materials:
- Fabric of your choice (cotton, flannel, or jersey are good options)
- Matching thread
- Sewing machine
- Scissors
- Pins
- Measuring tape
- Dog's measurements
Instructions:
1. Take Measurements:
- Measure your dog's chest circumference, neck circumference, and the length from the base of their neck to the base of their tail.
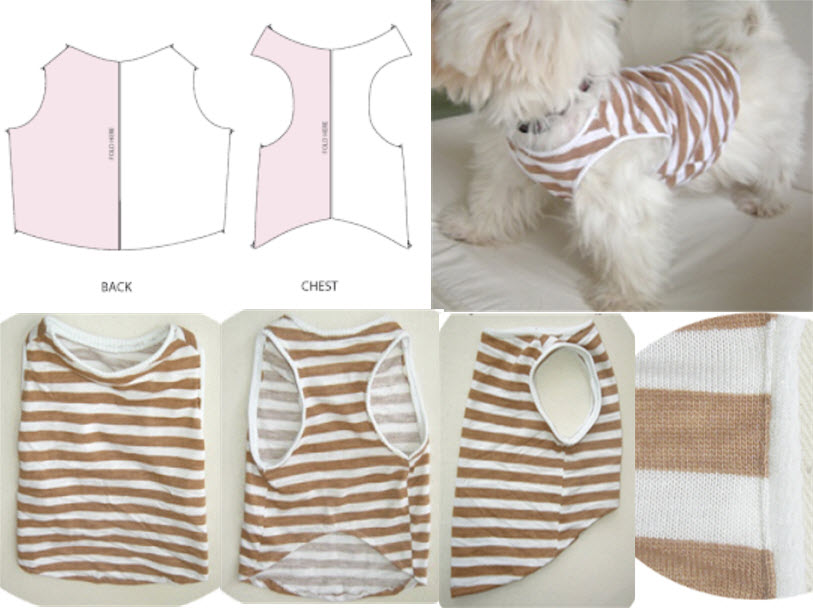
2. Create the Pattern:
- Draw the pattern on paper. It should consist of two main pieces - a rectangular body piece and a curved neck piece.
- For the body piece, the width should be the chest measurement plus some ease, and the length should be the length from the neck to the tail.
- For the neck piece, it should be a semi-circle, with the curved edge having a circumference that matches your dog's neck measurement.
3. Cut the Fabric:
- Fold your fabric in half with the right sides facing each other.
- Place your pattern pieces on the fabric and pin them in place.
- Cut around the pattern pieces to create the front and back of the shirt.
4. Sew the Body:
- With the right sides of the fabric facing each other, sew the body pieces together at the sides. Use a 1/4-inch to 1/2-inch seam allowance.
5. Sew the Neck Piece:
- Fold the neck piece in half, right sides facing each other, and sew along the curved edge, leaving the straight edge open. Turn it right side out.
6. Attach the Neck Piece:
- Pin the neck piece to the top edge of the body piece, aligning the straight edge of the neck piece with the top edge of the body piece.
- Sew them together, ensuring it's securely attached but not too tight to allow your dog to comfortably slip their head through.
7. Hem the Bottom:
- Hem the bottom edge of the shirt by folding it over twice (about 1/2 inch each time) and sewing along the folded edge.
8. Finish and Wear:
- After all the sewing is complete, give the shirt a final press with an iron.
- Slip it onto your dog, ensuring their legs go through the armholes created by the side seams, and fasten any buttons or snaps you've added.
This is a basic pattern, and you can customize it to your preferences. You can add buttons, snaps, or velcro closures for ease of putting the shirt on your dog. Additionally, consider adding decorative elements like appliqué, embroidery, or fabric paint to make the shirt unique and stylish for your furry friend.


