Creating a zipper pouch is a relatively simple sewing project, and you can easily make one using the following basic sewing pattern. You can adjust the dimensions to your preference.
Materials you will need:
- Fabric for the exterior
- Fabric for the lining
- A zipper (at least as long as the width of your pouch)
- Sewing machine
- Thread
- Scissors
- Pins or clips
- Iron
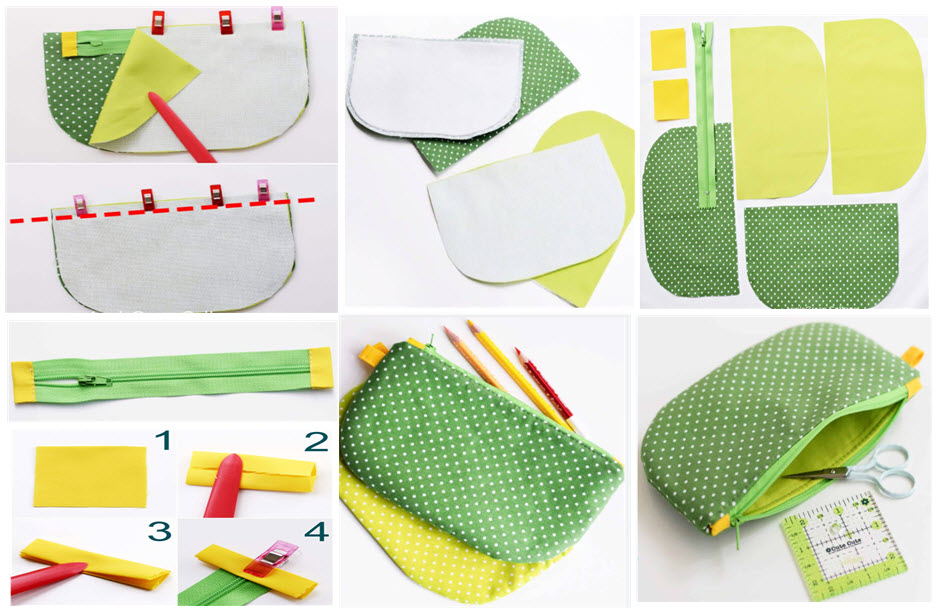
Here are the steps for a basic zipper pouch sewing pattern:
Cutting the Fabric:
- Cut two identical rectangles from your exterior fabric and two from your lining fabric. The dimensions will depend on the size of the pouch you want to create. For a standard pouch, you might use rectangles that are 9 inches by 7 inches.
Preparing the Zipper:
- Take your zipper and cut it to the same width as your fabric rectangles. If it's longer than your fabric, that's okay.
Sewing the Zipper:
- Place one exterior fabric rectangle right side up on your work surface. Place the zipper face down on top of it, aligning the top edge of the zipper with the top edge of the fabric. The zipper pull should be on the right.
- Place one lining fabric rectangle right side down on top of the zipper, sandwiching the zipper between the exterior and lining fabric. Pin or clip the layers in place.
- Using a zipper foot on your sewing machine, sew along the top edge, stitching through all layers. When you're done, flip the fabric pieces open and press them with an iron.
- Repeat steps 3-5 for the other side of the zipper. Place the other exterior fabric rectangle right side up, then the zipper face down, and finally, the lining fabric rectangle right side down. Stitch along the top edge and press.
Finishing the Pouch:
- Unzip the zipper halfway (this is important to ensure you can turn the pouch right side out later).
- Fold the fabric pieces so that the exterior fabrics are right sides together and the lining fabrics are right sides together. The zipper should be sandwiched between them. Pin or clip around the edges, leaving a small opening (about 2 inches) in the lining for turning the pouch right side out.
- Sew around the three remaining edges (not the edge with the zipper) using a 1/4 inch seam allowance. Be sure to backstitch at the beginning and end of the stitching, especially at the zipper ends.
- Clip the corners to reduce bulk.
- Turn the pouch right side out through the opening in the lining.
- Push out the corners to shape the pouch.
- Stitch the opening in the lining closed by either hand-stitching or machine stitching close to the edge.
- Push the lining inside the pouch and press the pouch to smooth out any wrinkles.
Your zipper pouch is now complete! You can customize it by using different fabrics, adding embellishments, or varying the dimensions to suit your needs.


