Creating a gnome sewing pattern can result in a charming and whimsical decorative item. Here's a simple outline of how you might create a gnome sewing pattern. Remember, creativity is key, so feel free to customize the design and materials to your liking.
Materials Needed:
- Fabric (body, hat, and beard)
- Felt or fabric scraps (for hat embellishment)
- Fiberfill or stuffing material
- Sewing machine and thread
- Embroidery floss (for facial features)
- Scissors
- Pins or clips
- Sewing needle
- Optional: small decorative items (buttons, beads) for additional details
Steps:
- Design and Measurements: Sketch out the shape and dimensions of your gnome on paper. Decide on the size of the gnome, including the height and width of the body, the length of the hat, and the size of the beard.
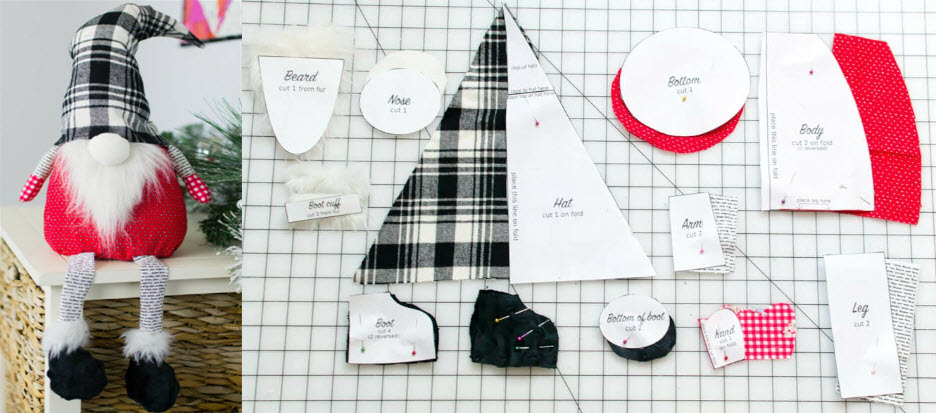
- Cutting the Fabric: Use the measurements from your design to cut out the fabric pieces for the body, hat, and beard. You'll need one body piece, one hat piece, and one beard piece.
- Assembling the Body: Fold the body fabric in half with right sides together. Pin or clip the sides together. Sew along the sides, leaving the bottom open. Turn the body right side out.
- Creating the Hat: Take the hat fabric and fold it in half lengthwise, with right sides together. Pin or clip the long edge. Sew along the long edge, creating a cone shape. Turn the hat right side out.
- Filling and Attaching the Hat: Fill the hat with stuffing to give it shape. Attach the open end of the hat to the top of the gnome's body. You can sew it in place by hand or with a sewing machine.
- Preparing the Beard: If the beard fabric is long, you can fold it in half lengthwise to make it fuller. Attach the beard to the bottom of the gnome's body, just below the hat, leaving some excess fabric for the beard to puff out.
- Adding Facial Features: Use embroidery floss to sew the gnome's facial features. Stitch on eyes, a nose, and a mouth using simple stitches like French knots and straight stitches.
- Embellishing the Hat: You can add felt or fabric scraps to the hat for embellishment. Cut out shapes like stars, hearts, or dots, and sew or glue them onto the hat.
- Final Touches: If desired, you can sew on small buttons or beads as additional decorative elements on the gnome's body or hat.
- Finish and Display: Once you're satisfied with the gnome's appearance, make sure all the seams are secure and all decorations are properly attached. Your gnome is now ready to be displayed as a cute decoration or gift.
Feel free to get creative with colors, fabrics, and details to give your gnome a unique personality. This is a basic guide, and you can adapt the pattern to create gnomes of different sizes and styles.


