Creating a detailed sewing pattern requires precise measurements and clear instructions. While I can't provide images, I can certainly help you with a textual description of how to make a moto jacket sewing pattern. Please note that this is a general guideline, and you might need to adjust measurements and details according to your preferences and body measurements.
Materials Needed:
- Tracing paper or pattern paper
- Ruler
- Measuring tape
- Pencil or fabric marker
- Basic sewing tools (scissors, pins, sewing machine, etc.)
- Fabric of your choice
- Lining fabric (if desired)
- Zipper, snaps, or buttons for closures
- Interfacing (optional)
Instructions:
1. Take Measurements: Measure yourself or the person you're making the jacket for. You'll need the following measurements:
- Bust
- Waist
- Hips
- Shoulder width
- Sleeve length
- Back length (from base of neck to desired jacket length)
- Neck circumference
- Armhole circumference
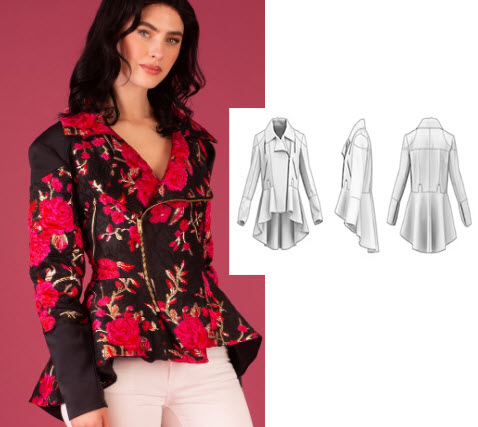
2. Drafting the Pattern: Use a large piece of tracing paper or pattern paper to create your pattern. Here's an overview of the key pattern pieces you'll need:
Front Panel:
- Draw a vertical line representing the center front (CF) of the jacket.
- Mark half of your bust measurement minus ease allowance (for snug fit).
- From the top, draw a slanted line for the shoulder slope.
- Mark the armhole by measuring down from the shoulder point, then out according to your armhole measurement.
- Continue down to the desired jacket length, adding a slight curve for the hem.
- Mark a notch where the collar will attach.
Back Panel:
- Draw a vertical line representing the center back (CB) of the jacket.
- Mark half of your bust measurement plus ease allowance (for ease of movement).
- Follow a similar process as the front panel for the shoulder slope, armhole, and length.
- Add a slight curve at the hem.
Sleeves:
- Draw a long rectangle for the sleeve, with the length equal to your sleeve measurement plus ease.
- At the top, angle the rectangle slightly for the sleeve cap (around 1/3 of the sleeve length from the top).
- On the curved edge, mark the notches for attaching to the armholes.
Collar:
- Draw a rectangle for the collar, with the length around your neck circumference plus ease, and the width based on your preference.
3. Adding Seam Allowances: Add seam allowances (typically around 1/2 inch or as desired) to all edges of your pattern pieces. Also, add extra allowance to the front edges for the zipper or closure overlap.
4. Cutting and Sewing:
- Cut out your pattern pieces from the fabric and lining (if using).
- Sew the shoulder seams of the front and back panels.
- Attach the sleeves to the armholes.
- Sew side seams, leaving room for pockets if desired.
- Attach the collar to the neckline.
- Add closures like zippers, snaps, or buttons.
Remember, making a tailored jacket can be quite intricate. Consider using muslin or cheaper fabric for a prototype to test the fit before cutting into your main fabric. Adjust the pattern as needed based on your prototype fitting.
Always follow sewing safety guidelines and consult more detailed sewing resources for visual instructions and tips.


